Iron County Fair 6×8 Pocket Page Scrapbooking Layout Featuring Graphic 45 Craft Supplies
Have you ever gone to a carnival, state fair, county fair or amusement park? And do you have any pictures that capture your most delightful memories from the experience?
Perhaps you have photos you took when the ferris wheel stopped at the top, capturing a bird’s eye view of the neighborhood.
Or maybe you have adorable pics of your loved ones enjoying treats such as cotton candy, snow cones, pretzels or ice-cold lemonade.
If you took carnival photos with cherished friends or loved ones, I urge you to consider getting those pics off your phone or camera, and putting them into a physical form that you can hold in your hands and enjoy.
If you want to make a scrapbooking layout to document the fun times you’ve enjoyed at the carnival or fair, I invite you to use the scrapbooking layout above as inspiration for documenting your own fair photos. It is super easy to do this using pocket page protectors.
What’s a Pocket Page Protector?
A pocket page protector is basically a page protector that’s divided up into smaller “pockets” that can each hold individual photos or papers. This style of page protector makes it easy to display multiple photos from the same day or event neatly together in one spot.
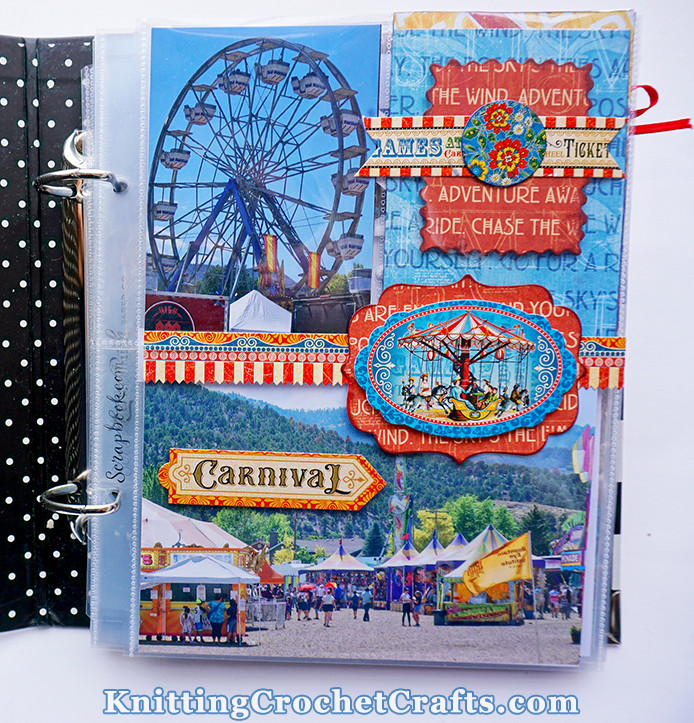
In the layout above, I used a pocket page protector that has 3 different pockets; one larger 4×6 pocket on the bottom, and two smaller 3″x4″ pockets on top. I have photos from the Iron County Fair displayed in two of the three pockets; and I placed carnival-themed embellishments in the third pocket.
I love pocket page scrapbooking layouts because they are so quick and easy to put together.
That said, there are also a couple of things I hate about pocket page scrapbooking layouts.
How to Overcome Common Problems With Pocket Page Scrapbooking
I really don’t like how rigid the grid layouts are, and I also dislike being able to see the page underneath the page you’re looking at because the seams on the pocket pages are typically see-though.
There’s an easy solution to both of these problems: You simply stick some stickers or other embellishments overtop of the seams. In the pocket page scrapbooking layout pictured above, you can see one possible example of how to do this. Of course, there are zillions of other ways you could make this idea your own.
Craft Supplies You Can Use for Documenting Your Carnival, Fair and Amusement Park Photos
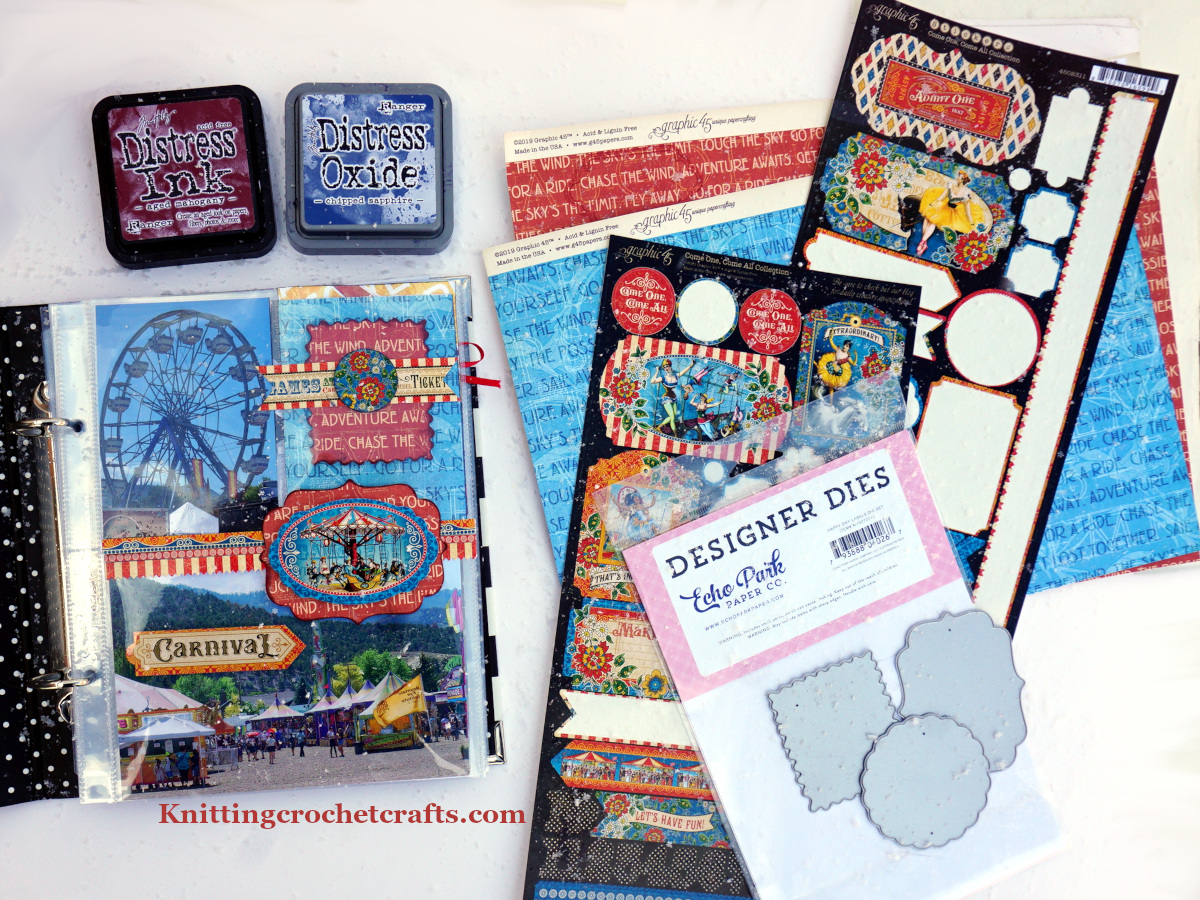
I created this layout to document my family’s visit to the Iron County fair a few years ago. I used papers and embellishments made by Graphic 45; the stickers are from their “Come One, Come All” collection”, and the papers are from the “Life’s a Journey” collection, both of which are now discontinued and hard to find (but don’t worry, you have many choices for scrapbooking paper and embellishments you can use.)
I recommend the following supplies for use in your carnival and fair-themed scrapbooking layouts:
- Pocket Page Protectors: If you want your layout to be the same size as the one pictured above, you’ll want to use 6×8″ pocket protectors. Other popular sizes are 8.5×11″ and 12×12″. You should get whichever size would best fit the album size you plan to use.
There are bunches of different brands making high-quality page protectors; I like the ones by Scrapbook.com and Echo Park Paper Company, but you have many suitable choices other than just those two brands.
See Also: 6×8″ page protectors for scrapbooking - Paper or Cardstock: For a page this size, you really don’t need much paper. If you have paper scraps left over from some other project, a page like this is a fantastic way to use them up.
To make this page, I used a 3″x4″ rectangle of patterned paper by Graphic 45 and smaller scraps of a different patterned paper design by the same manufacturer.
If you want to see suggestions for which cardstock and papers are currently available and popular, I invite you to check out this guide to paper for arts and crafts. - Adhesive: To achieve the three-dimensional look on this page, I used Double-Sided Adhesive Foam Strips by Scrapbook.com to lift up some of the elements on this page, like the carousel sticker and the little round floral sticker.
For the flatter page elements, I used Cherry Tape.
If you don’t already have any adhesive you can use, I highly recommend getting these two items; I use these adhesives in most of my paper craft projects. But these aren’t your only choices; you can use any paper-friendly adhesive you happen to have on hand. There’s no need to buy new adhesive just for this project if you already have a suitable option available. - Ink: I used Aged Mahogany and Chipped Sapphire inks around the edges of some of the page elements to make them appear to stand out more.
- Dies and a Die Cutter: These items are optional. If you already have dies and a die cutter, you might have dies on hand that would work for making label shapes like the ones I used on this page. But if you don’t, there’s no need to invest in a die cutter just for this page. There are lots of other ways to create similar label shapes. The dies I used for this project are no longer available, but there are many similar label-shaped dies and die cuts you could use to make a page like this one.
- Embellishments: I die cut the label shapes I used on this page. The other embellishments I used are cardstock stickers. However, you are not limited to using embellishments like these. There are zillions of possibilities.
- Binder or Album: You can make pocket page scrapbooking layouts without having a binder to put them in. However, I recommend making at least a tentative decision about the binder you’ll want to use before you start crafting. This is because different binders require different styles of page protectors. Some of the binders require specific styles of page protectors, and you need to think about that before you jump into the project.
For this project, I used a Simple Stories Snap Binder, and those are compatible with lots of other manufacturers’ pocket page protectors. Those are an excellent choice to consider using if you aren’t sure what to use, because it doesn’t lock you into using just one brand of page protectors.
See Also: Scrapbook Mini Albums
How to Create Your Carnival-Themed Scrapbooking Layout:
You can put your layout together pocket by pocket:
In the upper left-hand pocket, put a 3″x4″ photo.
In the upper right-hand pocket, you’ll put a 3″x4″ rectangle of patterned paper that you’ve embellished to your heart’s content.
On the page pictured above, I had to stick some of the embellishments outside the page protector because they didn’t all fit inside it.
So, I have the lower rectangle of patterned paper inside the pocket page protector; and I have the other layers of my embellishments stuck outside the page protector, on top of it.
In the lower pocket, put a 4″x6″ photo.
Stick Additional Embellishments Outside the Pocket Page Protector if Desired
As I mentioned above, one of my pet peeves is seeing through the seams on pocket page scrapbooking layouts. This drives me absolutely bonkers.
However, this seems to be a personal quirk of mine. It doesn’t bother a lot of other scrapbookers.
If it bothers you, too, please feel free to try the solution I’ve used on this page: Stick border stickers, border dies or other embellishments overtop of the seams.
If it doesn’t bother you, feel free to skip this step. There’s no sense in worrying about things that don’t need to be worried about, right?
I hope these ideas are useful to you as you document your lovely fair and carnival memories! Happy scrapping!
And, thanks so much for taking a look at my project. I really appreciate your interest.
Want to learn more about scrapbooking and paper craft supplies? If so, I invite you to return to this site often for more product reviews, paper craft tutorials, card making ideas, scrapbooking layouts and inspiration! You can make sure you don’t lose track of this site by signing up for my newsletter and community at Substack. .
Basic subscriptions are free; I send out regular newsletters to let my subscribers know about new craft articles and tutorials as they are posted. I also share details about the craft projects I’m working on, and invite my readers to share their projects, too. So there is no need to feel like it’s just you, crafting all alone at home. I’d love to have you join us! You’re invited!!
By Amy Solovay
Please Visit My Ko-Fi Shop HERE to Find My Sample Sale, Destash Sale and Digital PDF Pattern Downloads for Sale.
About the Author

Amy Solovay is a real, live, human content creator and educator who holds a Bachelor of Arts degree in mathematics from Sweet Briar College; she has also earned a separate Associate of Arts degree in textile design from FIDM LA (The Fashion Institute of Design and Merchandising, Los Angeles). She is NOT a robot and does not use artificial intelligence (AI) to write product reviews or articles for this website.
Amy learned to stamp and color as a small child, and she still enjoys stamping, collage art and mixed media art techniques all these years later.

As an educator, Amy Solovay used to teach in-person college courses in trend forecasting, marketing and surface design at California Design College in Los Angeles. Nowadays she uses online platforms for sharing her knowledge about textiles, crafts, current color trends and current design trends.
Find More Nostalgic Craft Supplies by Graphic 45
Do you adore nostalgic, vintage-inspired imagery? If so, you might enjoy checking out more craft supplies by Graphic 45. Find them HERE.
Find More Summer Craft Ideas
- Document Your Hawaiian Summer Vacation With These Hawaii Scrapbook Ideas
- Summer Vacation Scrapbooking Ideas
- Summertime Tubing at Brian Head Resort: A Scrapbooking Layout
- Check out more summer crafts HERE.
Learn More About Paper Crafts
Click HERE to Find the Latest and Timeliest Craft Ideas Posted in the Blog!
This page was last updated on 4-9-2026.