Free Crochet Pattern and Instructions
Bead chips and wire crochet go together like peanut butter and jelly. Why? I think it has something to do with the fact that bead chips are delightfully irregular, and wire crochet stitches are too — and the two types of textures complement each other perfectly.
If you haven’t yet tried crocheting with beads and wire, this project could be a great way to get started with the technique. While I wouldn’t call it an easy project, exactly, it is extremely forgiving of mistakes and irregularities. Another good starter project is this bead and wire crochet napkin ring, which is a bit less complicated — plus there is a step by step photo tutorial, so you can see the technique stepped out in pictures. This bracelet is made using basically the same technique, so the tutorial is worth a look even if you don’t plan to make napkin rings.
Craft Supplies You’ll Need to Crochet This Bracelet:
- Update 8-8-2021: When I originally posted this pattern, I was not aware of crimp beads, crimp tubes or crimping tools — so I did not know that these should have been included in the materials list for this project. In hindsight, I believe it would be an improvement to use crimp beads and a crimping tool for finishing this project, rather than weaving the ends into the project as I recommended. Please plan accordingly if you decide to make any bracelets using this pattern.
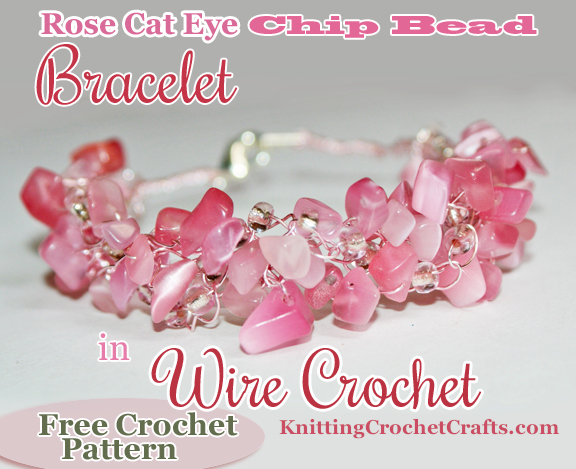
- Beads: You’ll need two different kinds of beads to make a bracelet similar to this one. The predominant beads are cat’s eye fancy chips by Beader’s Choice. The color name is “Romantic Rose.” The accent beads are 6/0 glass beads in a color that’s somewhere between clear and pale pink.
- Wire: I recommend 26 gauge wire for this project. I used permanently colored copper wire in the pink silver-plated color. This wire is manufactured by Darice.
- Jewelry Findings: I used a silvertone lobster claw clasp. If you can find a clasp that’s an exact color match for your wire, that would be an improvement, but if not just use the closest match you can find.
- Crochet Hook: I used a size B / 2.25 mm crochet hook to make my sample bracelet. I recommend using a sturdy hook, and one you don’t care too much about (in case it bends or breaks while you are crocheting.)
With any of the supplies listed above, feel free to make substitutions.
Bracelet Instructions:
Measure your wrist, or the wrist of the intended wearer. Add an inch or two to this measurement to allow a bit of “ease.” If you’re using large, chunky beads, go for two inches; if you’re using small beads, an inch is probably sufficient. You can add more ease than that if you want a very loose-fitting bracelet, or less ease if you want a tighter-fitting bracelet. The number you decide on here is going to be the length you make each beaded strand.
You are going to make 3 separate beaded crochet strands, then braid them together to form the bracelet.
Do one strand at a time. Start by stringing your beads onto your wire in the order you want them to appear in the finished bracelet. Leave a length of wire unworked at the beginning — at least 4+ inches long. (Do not count this length in your finished measurement.) Make a slip knot. [Slide a bead right up close to your crochet hook. Reach around the bead with your hook and grab the wire; pull a loop through to make a chain stitch with a bead caught inside.] Repeat the sequence noted in brackets until your strand is the length you decided you want to make. Leave another 5-6 inches of wire at the end. Cut the wire and pull the end through your active loop. Set the piece aside while you make the other 2 strands.
For my sample bracelet, I made 2 strands using just the rose cat-eye chips and the other strand using just the seed beads.
Align the strands so that you are holding them with the starting slip knots all in the same place. You should have 3 ends of wire poking out; braid these together as tightly and neatly as you can. Then shift the bracelet so that you can comfortably braid all three strands together. You’ll want to braid slowly and manipulate the strands as you braid, so that the beads all sit nicely and look good where you put them. When you are finished braiding, braid the other 3 ends of wire together, again making the braid as tight and neat as you can.
Tip: It’s hard to hold the work and braid at the same time. If you have a clipboard handy, you can clip the work to the clipboard and then do your braiding. If not, you could have a friend hold the work while you braid.
Attach one part of your closure at each end by slipping it over the braided part and then doubling the braid back over itself and twisting it together. Cut the ends neatly to finish.
So there you have it: That’s how to make a rose cat eye chip bead bracelet using the wire crochet technique. Enjoy your new bracelet!
Find More Jewelry Making Ideas:
More Craft Pages You Might Enjoy:
- Craft Supplies
- Knitting
- Knitting Supplies
- Lace Knitting
- Cable Knitting
- Knitting Techniques
- Knitting Yarn
- Quilting
- Beadwork
- Sewing
- Kitchen Crafts
- Holiday Crafts
- Christmas Crafts
- Paper Crafts
- Fine Art
Find More Craft Project Ideas HERE!
Posted By: Amy Solovay
This page was last updated on 7-25-2023.