Check Out the Brighter Days by Pinkfresh Studio If You Need Top-Quality Clear Stamps to Use for Paper Crafts, Including Card Making and Others!
Would your handmade cards and other paper craft projects benefit from incorporating a set of related floral –themed images that you can repeat and reuse as often as you need to?
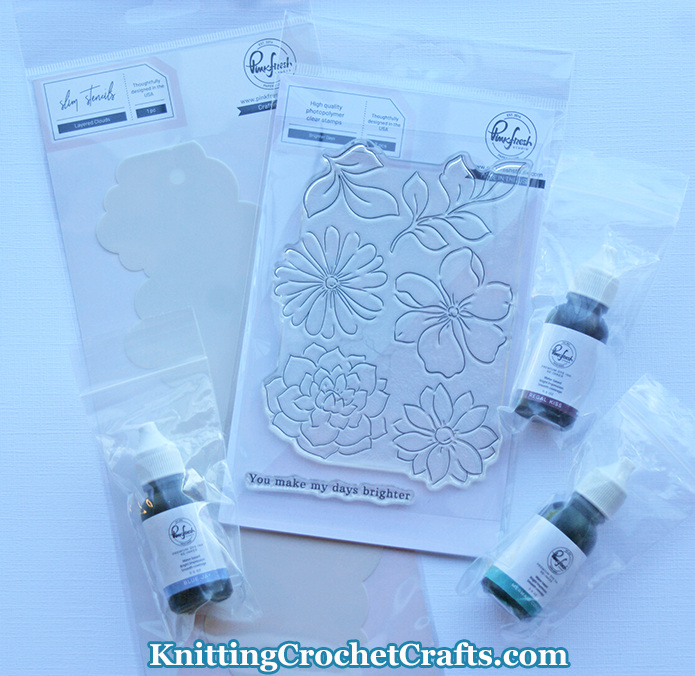
If so, there’s a lovely stamp set by Pinkfresh Studio that you really need to know about. It’s called the Brighter Days stamp set.
This clear stamp set comes with two stamps.
If you’re looking at the images, maybe you’re thinking, “huh? Only two stamps, but I see 6 different floral and leaf images here, plus a sentiment. The math just doesn’t add up, Amy! What’s going on? Did you lose track of how to count?
Haha! No, I didn’t get lazy with my counting.
Here’s the deal: Pinkfresh Studio sometimes likes to put all their images in a stamp set onto a single stamp, and then the coordinating die also has all the images in one die.
Theoretically, this is supposed to make it easier to stamp and cut out your images.
I assume that this process works as intended for crafters who buy the stamps AND the coordinating dies.
For me, it doesn’t work this way. But if you have a full-sized die cutter, and you plan to buy the stamps AND the coordinating dies, hopefully this way of configuring the stamps and dies will save you time and effort.
Sentiments Included in the Brighter Days Stamp Set by Pinkfresh Studio
The Brighter Days stamp set includes one lovely, useful sentiment. It says, “You make my days brighter” (no period on the end; I would have preferred it with a period, but that’s me. The lack of a period isn’t a deal breaker for me; I do use it).
This sentiment is particularly well-suited for use in card making projects. There might be other ways to use it, but I’ve only ever used it for card making.
Types of Paper Craft Projects You Can Make Using the Brighter Days by Pinkfresh Studio
The floral and leaf images in Pinkfresh Studio ‘s Brighter Days work well for incorporating into most types of paper craft projects, including the following:
- Calendar crafts, planners, and bullet journals;
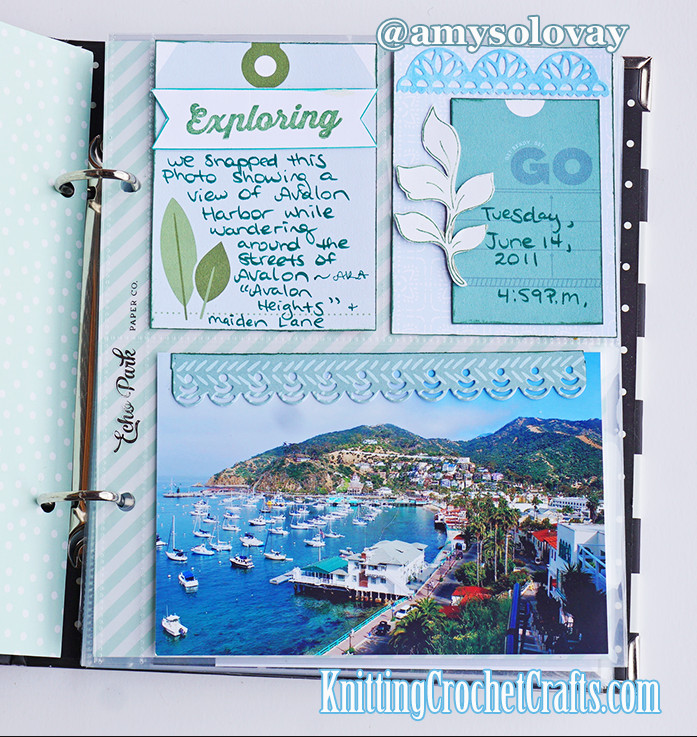
- Scrapbooks, travel journals, art journals and junk journals;
- Handmade cards and gifts;
- Collages, wall art and mixed media art projects;
- And more!
Craft Project Ideas for Using the Brighter Days by Pinkfresh Studio :
There are many ways you can use Pinkfresh Studio ‘s Brighter Days stamp set in your paper craft projects and other projects. These stamps are truly versatile. I invite you to check out some project ideas for using these stamps:
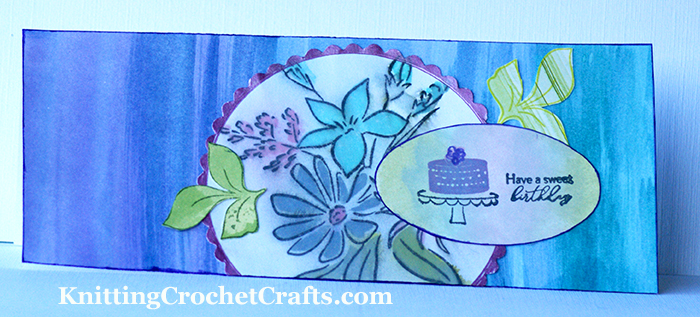
“Have a Sweet Birthday” Slimline Card With Ink Blended Background
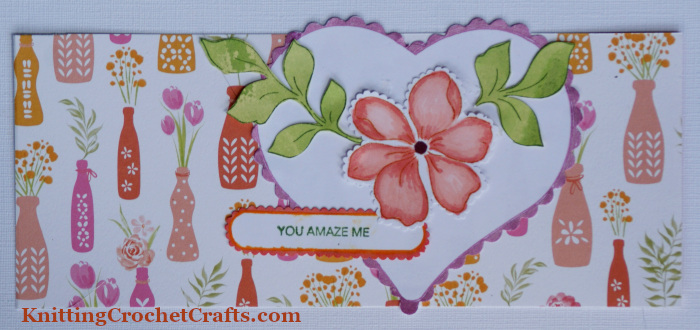
DIY Greeting Card With Pink Vases and a Flower Design
Downsides to the Brighter Days Stamp Set by Pinkfresh Studio
This stamp set is lovely and useful. Whether or not it has downsides is a matter of opinion. Some crafters, particularly those who have full-sized die cutters, love the way that Pinkfresh Studio makes it so easy to stamp floral images in one step, and then cut them all out in one step.
So if that’s your situation, this stamp set has no discernible downsides.
(Well, no downsides except for possibly the price, because it can get to be expensive, buying the stamps PLUS the coordinating dies, PLUS the layering stencils that are all meant to be used together. If you do a lot of paper crafting, the supplies are worth the price – but it isn’t likely to be worth it to buy all these things if you’re only going to use them once.)
If you don’t plan to buy the corresponding dies for this stamp set, or if you don’t have a full-sized die cutter, than you should really understand the details about this stamp set before you buy it – because some of you will no doubt find this set’s configuration so annoying as to be a deal breaker.
Let me explain.
I live in a small space, and so I choose to only keep a compact die cutter on hand. While I’d love to have a larger die cutter, I also need to have space for keeping other things, so I haven’t prioritized buying a full-sized die cutter.
So, the coordinating dies that match this stamp set won’t work for me, because they won’t fit through my compact die cutter.
So I didn’t buy the corresponding dies.
This leaves me with a stamp set that has 1 gigantic stamp that will stamp 6 different flower and leaf images, and it stamps in a way that I can’t easily separate them or stamp only one of them.
So to me, it’s really just kind of an annoyance, having 6 floral and leaf images stuck together on the same stamp.
I love all the floral and leaf images in this set. However, I use the leaf images 5 times more often than I use the floral images. So it is cumbersome to me to have to ink ONLY the leaf images, yet have a great big stamp to have to deal with (so I have to get out my corresponding big stamping block, which I don’t use very often.)
This configuration also interferes with the way I typically stamp and use stamps. It is not easily possible for me to stamp just one of the flowers directly onto a planner page, for example.
So, this greatly limits the usability and versatility of this stamp set.
So I don’t actually use it as much as I’d like to, which is a bummer.
That said, the configuration isn’t totally a deal breaker for me; I love these images enough that I grit my teeth and deal with the downsides often enough to use this set in ways that the set’s manufacturer probably didn’t even consider that someone would use it.
I love it that much!
These leaf and flower images are EXACTLY what I want to use for making all kinds of paper craft projects. You name it and I need flowers and leaves like this to use on it – planner layouts, handmade cards, scrapbooking pages, junk journal pages, ETC.
The appeal, for me, lies in having ultra-simple florals that are pictured at just the right angle for me to use and re-use many times over. This is exactly what I look for in a floral stamp set.
Most of the other floral stamp sets available out there are not comparable to this, because the angle or perspective on the floral images is not ideal.
So for my purposes, I like these images enough to work around the downsides.
Your mileage may vary.
The Verdict: I Highly Recommend the Brighter Days to Other Crafters (With Caveats!)
You will probably be most satisfied, and get the most use out of, this stamp set if you are willing and able to buy and use the entire “Brighter Days” product suite. The products are all sold separately, so you are not obligated to do this. But, it really isn’t easy or intuitive to use the stamps without the corresponding dies.
The products that are all designed to be used together are as follows:
- The Brighter Days stamp set
- The coordinating Brighter Days die set
- The Brighter Days layering stencils: these stencils make it so, soooooooooo easy to color in your stamped floral images, even if you have no idea how to draw or paint, and you haven’t taken any botanical illustration courses.
I don’t happen to need these layering stencils, because I did take botanical illustration classes, plus a zillion painting classes, plus I hold a degree in textile design, and I’ve designed and colored massive numbers of floral designs.
But if you aren’t already proficient with coloring floral images, these stencils are going to be your best friend, because they make you look like you ARE proficient with coloring floral images.
I think you’re going to be amazed at how lovely your floral images turn out, if you use all 3 of these products together.
But you might end up being less than amazed if you don’t use all 3 of the products from this product suite together.
If you aren’t planning to buy the corresponding dies, think twice about buying this set at all. In that case, I recommend considering the Fancy Floral stamp set by Gina K Designs as a possible alternative to this stamp set. You might like that one better. Or you might not. In some ways, it’s pretty similar to this set, so it’s worth at least taking a look at it to see if it could work for the projects you have in mind.
Overall, I have found all the stamps in this set to be really beautiful and useful for making a variety of projects, particularly for card making . I recommend this set to other crafters, keeping the above-mentioned caveats in mind .
Where to Buy the Brighter Days Stamp Set by Pinkfresh Studio
The Brighter Days Stamp Set is available for sale at Scrapbook.com. Check it out!
Other Craft Supplies You Will Need for Stamping With Pinkfresh Studio’s Brighter Days Stamp Set
To use this stamp set as intended, you’ll need some additional craft supplies beyond just the stamps themselves. The following supplies are all sold separately from the stamp set.
You’ll need one or more ink pads to use for inking up the images to stamp.
You’ll also need a surface like paper to stamp on. If you aren’t sure which paper to use, check out Neenah’s 110-lb cover stock in the Solar White color as one possibility to consider.
You might, or might not, also want to use something to color in the stamped images. You have many options for coloring media you could use:
- You could use Altenew’s Artist Markers;
- You could use Copic Ciao markers;
- You could use Tombow brush markers;
- You could use watercolor paints;
- You could use colored pencils;
- Or you could choose not to use any coloring media, and just leave the stamped image white (or whatever color your paper is.)
Pro Tip: Coloring is time consuming, and I don’t always want to take the time to do it. In cases where you’re pressed for time, you can simply stamp on colored cardstock that’s the color you want your finished image to be. For example, if you want to end up with green leaves, stamp your leaf image onto green cardstock. Voila! You’ll have green leaves that you didn’t need to spend time coloring. Or if you do want to color, you can at least save time not having to start from plain white.
Related Resources:
- Journaling Prompts for Scrapbooking
- Journaling With Stickers
- Scrapbook Journaling: Should Every Scrapbook Page Have Journaling?
- Best Bullet Journal Stencils
- How to Use Stencils
Reviewed By: Amy Solovay
About your reviewer: Amy Solovay is a crafter, content creator and educator who holds a bachelor’s degree from Sweet Briar College in Virginia and a separate degree in textile design from the Fashion Institute of Design and Merchandising in Los Angeles. Amy has been an avid stamper since her childhood, and she took up paper crafting again as an adult in 2006. She enjoys Card Making and all kinds of other paper crafts.
As an educator, Amy Solovay used to teach in-person college courses in trend forecasting, marketing and surface design at California Design College in Los Angeles.
Nowadays, Amy uses online platforms to teach digital courses to craft pattern designers, content creators and influencers all over the world.
This page was last updated on 9-1-2024.