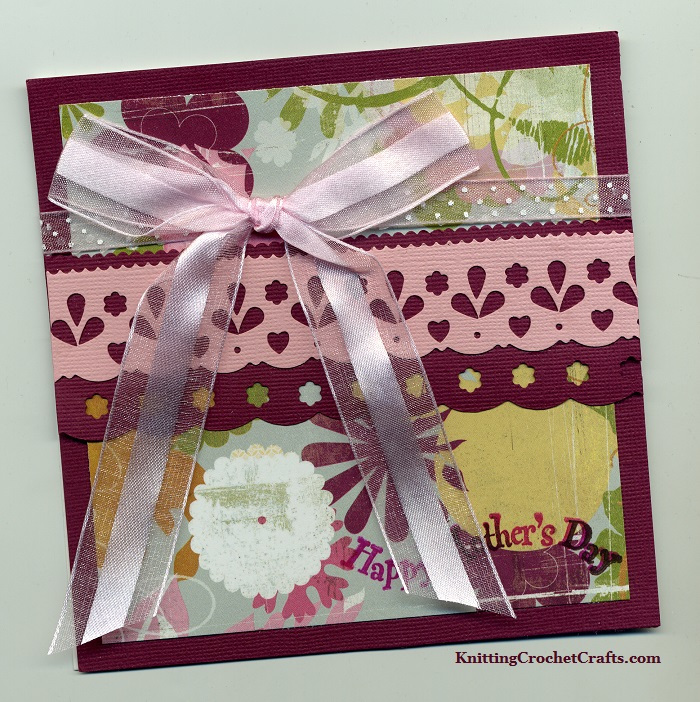
Card Dimensions: 5.5” x 5.5”
How to Make the Paper Lace Band for Embellishing the Front of the Mother’s Day Card:
Top Layer: Cut a 1” band of light pink textured cardstock (Bazzill) using “Mini Scallop” Paper Edgers (Fiskars) as the upper edge and “Seagull” Paper Edgers (Fiskars) as the lower edge. Punch the lace design using 5/16” teardrop, ¼” heart, ¼” flower, and 1/16” circle hand punches (Fiskars.)
Bottom Layer: Cut a 1 ¾” band of burgundy textured cardstock (Bazzill) using using “Mini Scallop” Paper Edgers (Fiskars) as the upper edge and “Clouds” Paper Edgers (Fiskars) as the lower edge. Punch the lace design using the ¼” flower hand punch (Fiskars.)
Attach top and bottom layers together using a high-quality craft adhesive such as Zip Dry paper glue.
How to Make the Mother’s Day Card:
Cut your card base to size.
Score and fold it using a scoring tool for paper. Set it aside.
Stamp “Happy Mother’s Day” (Hero Arts) onto the lower right corner of a 5” x 5” piece of patterned paper (Basic Grey) using contrasting colors of ink. Layer this on top of a 5.5” x 5.5” piece of textured cardstock (Bazzill.) Cut approx a 7” piece of 3/8” wide sheer polka dot ribbon. Tie a piece of 7/8” wide ribbon loosely in a bow. Thread the polka dot ribbon through the center of the bow and tie it tight. Attach the ribbon to the layered paper, wrapping the ends of the ribbon around to the back. Attach to front of card. Attach paper lace band to front of card.
CLICK HERE to find our main directory of card making ideas and instructions.
CLICK HERE for Information About the Art and Craft Supplies I Recommend:
By Amy Solovay
About the Author: Amy Solovay is a freelance writer with a background in textile design. She holds a bachelor’s degree with a studio art minor; and she has also obtained another degree in textile design.
This page was last updated on 8-17-2021.