Free Crochet Pattern for a Rag Rug to Use as a Bath Mat or Area Rug

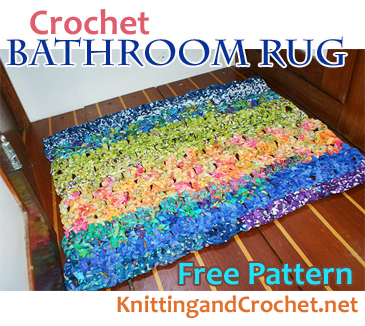
Want to crochet a small area rug for your bathroom or any room in your home? If so, this free pattern is worth your consideration. This luxurious crocheted rug makes a beautiful and sturdy bath mat, welcome mat or area rug you can place in any room to add color, visual interest and functionality to your space.
This is not a large rug; it’s the ideal size for a bathroom rug in a small bathroom. It measures only 23″ wide x 18″ high. However, its visual impact is significant because of the colorful batik fabrics used for crocheting the design. The fabrics you choose for this will make a huge difference in the outcome of your project. You could use these instructions to crochet bathroom rugs in a variety of different prints and “personalities”, from mid-century modern to country romantic.
Supplies Needed to Crochet a Bathroom Rug:

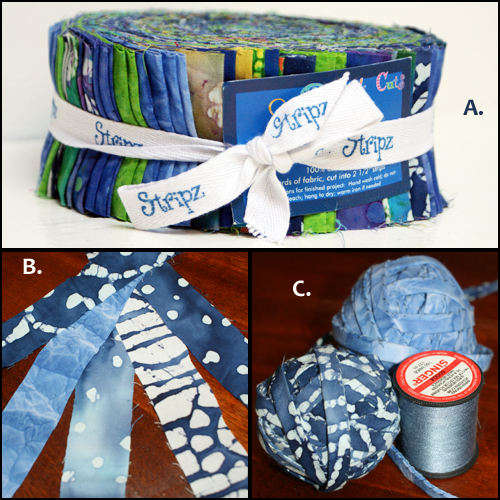
Fabric Strips: To crochet my sample bathroom rug, I used a bit less than two bundles of Stripz fabric strips (a quilter’s “jelly roll”). See view A in the photo collage above. If you’re cutting your own cloth for this project, you’ll need about 7 yards of 46″ wide woven cotton fabrics. For best results, it’s smart to cut your fabric diagonally (on the bias) to prevent frayed edges.
I cut my cloth into strips that each measure approximately 1.25 inches high by about 46 inches wide; see view B in the photo collage above. Then I sewed all the strips in similar colors together end-to-end to create one long, continuous fabric strip in each color. Because the edges of my fabric were fraying, one more step was important: I folded the fraying edges inward and then sewed all the way down each strip to secure it. Then I made a rag ball by winding all the fabric strips into a ball, much like you’d wind up a ball of yarn.
If the edges of your fabric are not fraying, you can omit the extra step of folding and sewing the edges inward.
Crochet Hook: I used a size N – 9.0 mm hook for crocheting my project sample.
Gauge:
One full stitch pattern repeat of 3 dc sts plus 1 ch = about 2″.
Size of the Completed Rug: My completed rug measures about 23″ wide by 18″ high.
How to Crochet a Larger Bathroom Rug: If you want to crochet a rug that’s larger than my project sample, simply start with a longer chain at the beginning of the piece. You’ll want to add stitches to the foundation chain in multiples of 4. Remember that you’ll need more material to work with if you choose to make a bigger rug.
List of Crochet Abbreviations:
- ch = chain
- dc = double crochet
- ea = each
- rep = repeat
- st = stitch
Pattern Notes –Beginning with row 2, work in front loops only of your sts.
If you want a multicolored rug, either use multicolored fabrics or plan out your color changes. I used multicolored fabrics to make my sample rug. I stitched all the fabric strips in similar colors together and wound them into rag balls (See view c of the photo collage posted above to take a look at two of the rag balls; there were bunches more when I was finished). I decided that I was totally OK with random color changes, so I decided to stitch all my rag balls together before I crocheted my rug.
Be aware that there are no color changes written into this pattern. You may prefer to be more deliberate about your color changes; if so, you can maintain separate colored balls of fabric and simply change colors when you want a different color to appear in your rug design. This pattern lends itself well to random striped designs.
Crochet loosely throughout for best results.
The turning ch counts as 1 dc st throughout.
How to Crochet the Rug:
Ch 52.
Row 1: dc in 3rd ch from your crochet hook. Work 1 dc st in ea of next 2 dc sts. [ch 1, work 1 dc in ea of the next 3 sts.] Rep the sequence in brackets all the way across the row.
Row 2: ch 4, turn. The 1st 3 ch sts count as 1 dc; the 4th ch st counts as 1 ch st. [Skip the next st. Work 1 dc st in ea of the next 3 sts, ch 1.] Rep the sequence in brackets all the way across the row. End the row with a group of 3 dc sts.
Rep row 2 until your piece is the desired size.
How to Finish Your Crochet Bathroom Rug:
End off. You can weave in your ends as usual or sew the ends to the piece using a needle and thread.
So there you have it: free instructions for a crochet bathroom rug. Enjoy!
Related Resources:
- Click here to find more crochet rug patterns.
- Click here to find our main directory of crochet information.
- Click here to learn your your crochet stitches.
- Click here to learn all about crochet techniques.
- Click here to check out more craft project ideas.
By Amy Solovay
About the Author — Amy Solovay is a freelance writer with a background in textile design. She learned to crochet as a small child. After earning two degrees, one of which is in textile design, she launched a career in the textile industry. She has worked as a textile print colorist, knit designer and director of design for various Los Angeles based fabric manufacturers. Later she transitioned to writing about crochet, knitting, crafts and other topics for major media outlets. She enjoys designing crochet and other craft patterns, and she invites you to make use of them.
This page was last updated on 8-10-2021.