Wondering how to use stencils?
Perhaps you’re curious about what kind of mediums work best with stencils — sprays? stencil butter? stencil paste? acrylic paint? You’re invited to check out my tips and advice on how to use stencils, below.
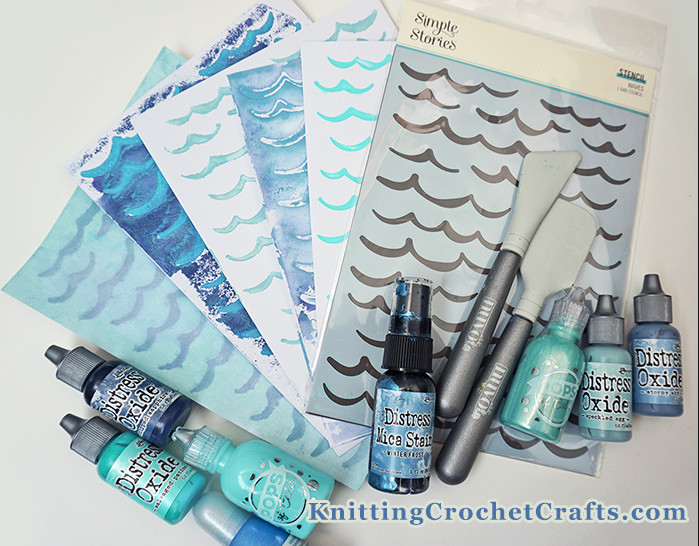
Your first step: grab a stencil you want to use plus some ink blending tools, a spatula, sponge brushes, or a stipple brush.
Then you have to decide what medium you want to use with your stencil. I like using the following media:
- Reinkers from any ink brand.
- Cheap acrylic paint from any brand you happen to have.
- Pops of Color by Scrapbook.com. This product comes in several different finishes including Pearl, Glitter and Gloss.
- Mica Stain Spray
- Stencil Butter.
- Stencil Paste.
All of these media give you different results:
- Use acrylic paint if you’re on a tight budget or if there are unique colors you need to match when you make your project.
See Also: What Paint to Use With Stencils
- Use a reinker if you happen to have one in a color you want to pair up with your stencil design.
- Use Pops of Color if you want a hard, stiff stenciled image or if you are new to stenciling; I think Pops of Color is one of the easiest media to stencil with.
Pops of color hardens to a finish that feels a bit like plastic. It makes a good resist, so you can easily use sprays, paints or inks to create a colorful background around your stenciled area if you use this product. However, I don’t recommend using this product if you’re making a card you want to send through the mail, unless you don’t mind paying extra for the amount of postage required to mail a rigid object. - Use Pops of Color in the Pearl finish if you want a rich, lustrous shimmery surface on your stenciled image.
- Mica spray also results in a gorgeous, shimmery finish — and I like Mica a LOT, because it is so beautiful, and unlike Titanium Dioxide, which may be carcinogenic, Mica is believed to be harmless. However, I recommend saving any sprays for when you have more experience working with stencils, because it can be a bit of a challenge to get sprays exactly where you want them; they can make a real mess.
If you happen to have reinkers in your craft supply stash, I invite you to grab one along with your stencils and tools and try this idea:
Use the reinker to drop a few drops of ink onto one of the ink blending tools. If you want a watery effect, or if you want a lighter tonal of the ink color, or if you just want to make your ink go a little further, you can also dribble or spritz a tiny bit of water onto the ink blending tool — but that’s optional. Definitely don’t overdo it with the water, though.
If you try this method, it’s wise to blot onto a piece of scratch paper first. If you skip that step, you are almost guaranteed to end up with ink underneath your stencil.
If you do accidentally get ink underneath your project, it isn’t a big deal. Just fussy cut around your stenciled image and adhere it to your project where you want it; this way, you will simply cut off the extra smudges, and no one will be the wiser that they were ever there. But that tip doesn’t work for every project, because there are also cases when you will need a clean image. When you need a super clean, non-smudgy stenciled image, your chances are better at achieving that after you’ve stamped multiple images and the ink on your blending tool is starting to dry out a bit, but isn’t so dry that you can’t keep stenciling.
I have a stencil that I like to use for making journaling blocks, and smudges on that one drive me bonkers; I use the same method but wait until I’ve stenciled a lot of other images. Then when I’m close to running out of ink on the ink blending tool, I go ahead and do the journaling blocks. That makes for a faint image, which is fine in that case, because it’s just lines that I use for making sure my journaling doesn’t end up wonky. It doesn’t need to be particularly visible on the finished project.
If you use this method, it’s wise to allocate a block of time to just stenciling, and do a whole bunch of stenciled images at once in the same color, so you can make the most of your ink and not waste bunches of ink. Doing that can also really speed up your scrapping / card making sessions later, because you will already have a bunch of images stenciled and dry and you can just use them without having to stop and stencil a bunch of stuff.
You could also try the same thing using sponge brushes from the hardware store. My favorite sponge brushes for this have a bell-shaped sponge, but any of them can give interesting effects. With sponge brushes, if you’re careful to thoroughly wash them before your ink or other media dry, you can reuse them bunches of times.
In one of the photos above, you can see a picture of Nuvo’s spatulas, which are also useful tools for stenciling.
I recommend trying several different media using different tools to see which stenciling techniques you enjoy most.
One other important tip: Tape your paper to the table, and then tape your stencil to your paper using washi tape or another gentle tape that is easy to remove later.
One more thing: Clean up your tools and stencils as soon as possible after use so your supplies don’t get stained and ruined.
Thanks so much for your interest in this stenciling tutorial! Happy stenciling.
I invite you to return to this website often to find additional paper craft tutorials, project ideas and inspiration. You can make sure you don’t lose track of this site by signing up for my newsletter and community at Substack. .
Basic subscriptions are free; I send out regular newsletters to let my subscribers know about new craft articles and tutorials as they are posted. I also share details about the craft projects I’m working on, and invite my readers to share their projects, too. So there is no need to feel like it’s just you, crafting all alone at home. I’d love to have you join us! You’re invited!!
By Amy Solovay
About the Author:

Amy Solovay is a real, live, human content creator and educator who holds a Bachelor of Arts degree in mathematics from Sweet Briar College; she has also earned a separate Associate of Arts degree in textile design from FIDM LA (The Fashion Institute of Design and Merchandising, Los Angeles). She is NOT a robot and does not use artificial intelligence (AI) to write craft tutorials or articles for this website.
Amy learned to stencil, stamp and collage as a small child, and she still enjoys mixed media art techniques all these years later.
As an educator, Amy Solovay used to teach in-person college courses in trend forecasting, marketing and surface design at California Design College in Los Angeles. Nowadays she uses online platforms for sharing her knowledge about textiles, crafts, current color trends and current design trends.
Want More Stenciling Ideas? Check Out the Following Pages:
- Where to Next? A scrapbooking layout with stenciled background
- Colonial Beach, Virginia, Stenciled Scrapbooking Layout
Discover More Paper Craft Ideas:
Related Resources:
- Stencils
- Best Bullet Journal Stencils
- 4 Ink Blending Techniques for Card Making and Paper Crafts: Tutorials Plus Project Ideas
This page was last updated on 12-12-2025.
Love the stenciling examples you’ve posted. Very helpful! Thanks!