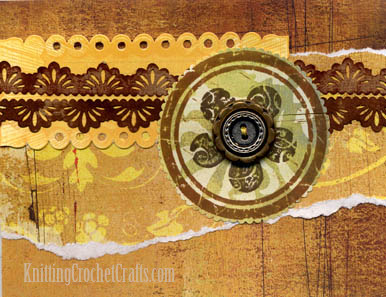
I love how this warm yellow and sepia toned card turned out. The torn paper and distressing create a casual, informal effect and the paper laces add feminine flair.
Tools & Supplies Used:
- Fiskars Sunburst Border Punch
- Patterned papers from BasicGrey’s Motifica collection (Good luck finding them! This paper has been discontinued.) I used 3 different patterned papers from the 8 x 8 pad. Feel free to substitute other similar papers if you don’t have these.
- Kraft Cardstock (used for making the paper lace)
- Inks- Tim Holtz Distress Inks in Vintage Photo and Walnut Stain
- Vintage metal buttons. I used 2 floral metal buttons nested inside each other. Again, feel free to substitute with whatever buttons you have in your stash, because I doubt you are going to find the exact same buttons I used.
- A pretty flower stamp: I used the Bella Flora Mini Stamp Set by Inque Boutique, but this stamp set is no longer available, so you will have to substitute some other flower stamp instead of this one.
- I used the Great Shapes stamp set by Inque Boutique for the circle shape surrounding the flower, but there are a zillion other circle stamps you could substitute for this one.
- The Yellow Paper Lace Tag is From the Wild Saffron Collection by K & Company
- Mini Scallop Paper Edgers by Fiskars
- Adhesive of your choice.
Instructions For Creating This Greeting Card:
- Using the kraft cardstock and the Fiskars Sunburst punch, make the paper lace as shown above, ink with Tim Holz Distress Inks, and set it aside.
- Follow the instructions shown above under “cardmaking basics” for making the card using bristol board.
- Cut a piece of BasicGrey paper to 4 1/4″ x 5 1/2″ & attach to front of card.
- Tear a piece of BasicGrey paper & attach to front of card
- Attach a yellow paper lace label/ tag from K & Company’s Wild Saffron collection to the front of the card.
- Next, adhere 2 pieces of your handmade paper lace made from the Fiskars Sunburst Punch onto the front of the card.
- Ink the round journaling stamp from the Great Shapes Mini Stamp Set by Inque Boutique. Try not to get ink on the journaling lines in the center, but if you do, wipe the excess ink off with a tissue.
- Stamp the image onto BasicGrey paper. (See photo below for positioning.)
- Ink the larger flower stamp from the Bella Flora mini stamp set by Inque Boutique. Stamp it into the center of the previously-stamped circle from the Great Shapes Journaling stamp. Please take a look at the photo below to get a better idea of how I positioned the stamps on the paper. You don’t have to do it exactly like I did it, but I’m showing you how I did it just in case you do want to duplicate this effect exactly.

- Cut around the round stamped image with Fiskars Mini Scallop Paper Edgers Scissors.
- Sew the button(s) into the center of the stamped flower using sewing thread and a needle.
- Adhere the entire round stamped image with button(s) onto the front of the card.
- Personalize the greeting on the inside of the card using either sentiments stamps or your own handwriting.
- Send and enjoy!
More Craft Pages You Might Enjoy:
- Card Making
- Stamping
- Scrapbooking
- Craft Supplies
- Knitting
- Knitting Supplies
- Lace Knitting
- Cable Knitting
- Knitting Techniques
- Knitting Yarn
- Quilting
- Jewelry Making
- Best Tools for Jewelry Making
- Beadwork
- Sewing
- Sewing Appliques
- Button Crafts
- Kitchen Crafts
- Holiday Crafts
- Christmas Crafts
- Paper Crafts
- Fine Art
Find More Craft Project Ideas HERE!
Posted By: Amy Solovay
This page was last updated on 8-17-2021.