Stamperia’s Reusable “Little Dots” Stencil From the Christmas Collection
The Little Dots Stencil by Stamperia Allows You to Stencil Backgrounds That Look Like Stars, Snow or Small Abstract Dots and Sunbursts,
Are you hoping to incorporate an allover pattern resembling stars or snow into bunches of your art or paper craft projects?
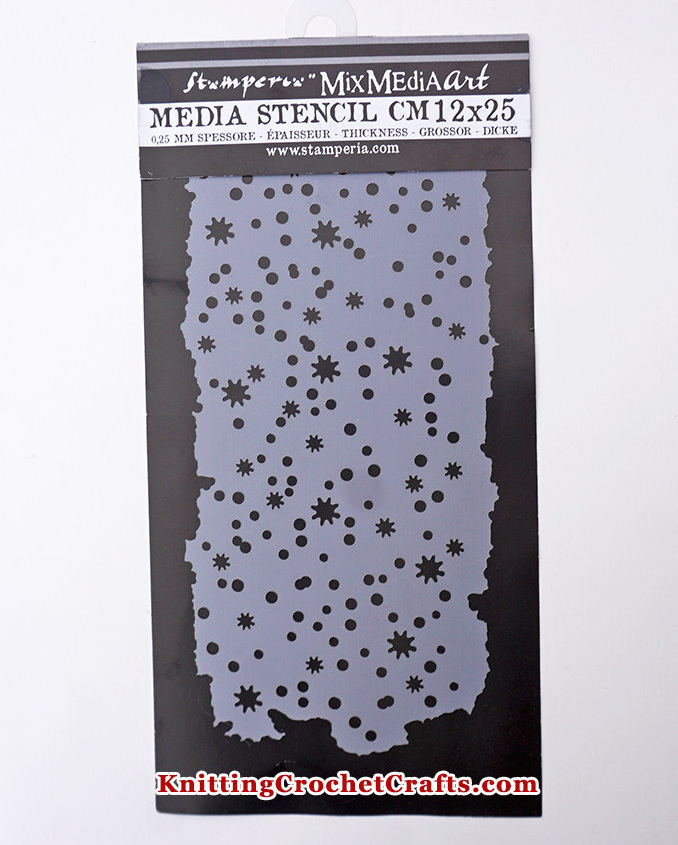
If so, Stamperia’s reusable “Little Dots” stencil is just what you need.
The edges on the stencil are deckled rather than being precisely straight.
The “Little Dots” stencil is suitable for use with many craft techniques. You can use it to make patterned images to use in all of the following types of crafting activities:
- Scrapbooking;
- Card making;
- Junk journaling;
- Collage or any other mixed media art;
- Art journaling;
- Or any other paper craft techniques you have in mind.
- If you need to keep your crafting expenses low, try using this stencil with cheap-o acrylic paint to see if you like the results. There are many benefits to using acrylic paint – namely, the affordable cost and the broad availability of different colors you could mix and use.
However, be aware that it takes more skill to stencil with acrylic paint than it does to stencil with some other types of dedicated stenciling media. So if you’re a beginner to stenciling, and you can afford to buy dedicated stenciling media, I recommend doing so.
If you decide to stencil with acrylic paint, try using either a stipple brush, sponge brush or Scrapbook.com’s foam-tipped ink blending tool to apply the paint.
See also: What paint to use with stencils. - For beginning paper crafters, experts and everyone in between, Stencil Butter is my top pick for the easiest stenciling media.
I’ve extensively tested Stencil Butter with this exact stencil design, and it really does go on like butter. I think he results are stunning!
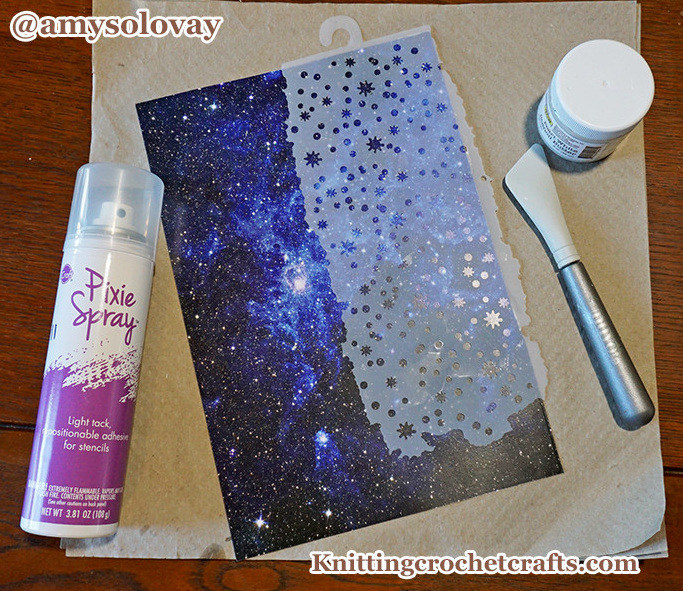
If you want to see examples of how this stuff looks in a finished project, check out the project photos on this page; I made all of them using Pearl White Stencil Butter by the Crafter’s Workshop. - My other go-to favorite stenciling media is Stamperia’s Mix Media Art Modeling Paste. You’d want to use this in cases where you’re hoping to achieve a noticeably textured, three-dimensional effect.
In every project so far where I’ve used the “Little Dots” stencil, I’ve either wanted to create a starry background or a snowy one. Modeling Paste, out of the container, is stark, bright white, which might or might not be what you want if you’re designing a project that incorporates stars or snow.
After you stencil with the Modeling Paste, you can spray a medium like Stamperia’s Aquacolor or Tim Holtz’s Distress Mica Stain over your stenciled design and then sand a little bit of the embellished Modeling Paste off of the top with a sanding block. This will reveal the white color underneath the spray. If the white is too bright, you can take a paintbrush and touch up the white areas with a bit more paint or ink in the color you want. There are lots of other ways to use Modeling Paste, but that’s one of my favorite ideas for using it. - You can use graphite pencils, colored pencils, pens and / or markers with this stencil, but with this detailed of a stencil design, that’ll take quite a bit of time to do. But you could use this technique quite effectively if you were to just select a small area of the stenciled design to reproduce this way.
- Solar Paste by Simon Hurley for Ranger Industries
- Lunar Paste by Simon Hurley for Ranger Industries
- Pops of Color by Scrapbook.com – This stuff dries hard and is a lot less flexible than some of the other stenciling media mentioned on this page; it goes on easy and is a great choice for beginners. It comes in a teeny, tiny bottle, so the buy-in cost is relatively low, even though it’s an expensive product compared to, say, acrylic paint. If you use this stuff, I recommend applying it with a spatula or palette knife, although you have many other options beyond those.
- Distress Mica Spray by Tim Holtz for Ranger Industries – You can spray this onto your paper through the stencil without needing a separate applicator; that said, I sometimes like to apply it by spraying it onto a Scrapbook.com foam-tipped ink blending tool and then pouncing or dabbing it onto the paper through the stencil. So, you have multiple workable options if you want to try this.
- Ink: Tim Holtz’s Distress Oxide Ink is my favorite ink for stenciling applications, but you have lots of other options besides this one.
- Nuvo Embellishment Mousse (recommended with caveats that you can read about in my detailed Nuvo Embellishment Mousse product review, HERE.)
- More! You have lots of additional choices besides these, but these are my current favorites.
- Find My Product Review of the 12×12 Papers from the Cosmos Infinity Collection HERE. The TLDR version of my review: I highly recommend these papers! They are STUNNNG! (If you’re already convinced of that without reading my product review, you can shop for them HERE.)
- Learn More About the 8×8 Papers from the Cosmos Infinity Collection HERE. I’ve used these, too, and they are so, soooooooooooooooo lovely. If you want to pick up some for yourself, you can shop for them HERE.
- Find My Product Review of the Modelling Moulds from the Cosmos Infinity Collection HERE. There are multiple moulds in this collection; I have two of them, and both of them are amazing! You can shop for them HERE.
- Stamperia Stencils
- How to Use Stencils
- Best Bullet Journal Stencils
- Christmas Stencils
- Find more of my stencil recommendations HERE.
This stencil is part of a past Christmas collection from the Italian manufacturer known as Stamperia. You can use this stencil with a variety of different media; the media you choose will depend on your budget and the effects you want to achieve:
Stencil Butter is my top pick for the easiest stenciling media to work with, and also for the prettiest stenciling media; Stencil Butter is faintly shimmery, with a pearlescent finish. I use it often because I’ve found that I can rely on it to apply smoothly and look gorgeous in my finished projects.
The above-mentioned media are ones you’d want to choose if you’re using this stencil to embellish paper, chipboard, cardboard or another similarly porous surface.
Whichever media you use, this is a stencil that would benefit from an application of Pixie Spray or a similar repositionable adhesive before you use it.
(All the above-mentioned stenciling media and Pixie Spray are sold separately from the stencil).
Using This Stencil to Embellish Non-Porous Surfaces Like Acrylic, Metal or Glass
If you want to embellish a non-porous surface like acrylic, you might be able to use this stencil to accomplish that, but it would take some skill to do, and you’d also need a different type of media than the ones mentioned above.
Appropriate media for this type of task would be ones that are specifically formulated for use on non-porous surfaces. So you’d want to try using a media like Sta-Zon ink, alcohol marker (like Copic or Altenew Artist markers), or alcohol ink. I haven’t tried using any of these with this stencil, but I think they’d work okay if you want to give ‘em a try.
If you do decide to try this, please report back and let us know how it works out for you. We’d love to learn from your experiences. The floor is open for comments, so please share your insights in the comments area below.
The Verdict: I Highly Recommend the “Little Dots” Stencil by Stamperia!
So far, my experiences with the “Little Dots” stencil have all been positive.
I have enjoyed using this design to create multiple stenciled images and paper craft projects, some of which are pictured here on this page.
Stamperia makes several different weights and sizes of stencils; some of them are sturdy and easily reusable, while others are quite flimsy. This is one of their thicker, sturdier stencil designs; I found the stencil to be reasonably sturdy and easily reusable, over and over and over again. This is a feature that I, personally, care a lot about and seek out in a stencil – and so this aspect of the stencil design gets a huge thumbs up from me.
I think this stencil’s patterned image is appealing, useful and versatile; you could use it in many situations where you need a background that resembles abstract dots, stars or snow.
The stencil cleans up easily if you are prompt about washing it with soap and water immediately after use.
I’m delighted to recommend this stencil to other crafters. I think it offers outstanding value for its asking price, and I have found it to be useful for my own paper crafting projects. I really love it, and I think it’s likely that you’ll enjoy using it, too.
Important Note: I am a real person, and this is an authentic product review. I paid full price for my Stamperia “Little Dots” stencil, and I think it was worth the price.
Where to Buy the “Little Dots” Stencil by Stamperia
How to Apply Your Stenciling Media to Your Paper (Or Other Surface) Through This Stencil
There are different tools you can use for applying stenciling media through your stencil.
If your media is relatively thick, stiff and sticky, I recommend using a spatula to apply it. You can get these in the kitchen department at most department stores, but the spatulas I like best are specifically engineered for use with mixed media art techniques. I happen to have this set of 2 spatulas by Nuvo, but there are many others like these that would work just as well.
Many artists use a palette knife to apply stenciling media. I don’t personally do it this way because I prefer to use a spatula. But, you do you! This is especially recommended if you already have experience with other art forms that require a palette knife; if you happen to have one hanging around, you can grab it and use it for this purpose, too.
It’s also possible to apply thick, stiff, sticky media in other ways – perhaps using a stipple brush, paintbrush, sponge brush, or ink blending tool. Be sure to proactively clean these up immediately after use, because if you don’t, this kind of media will absolutely ruin your brush or tool.
In my experience, Scrapbook.com’s ink blending tool works for applying both thick and thin media to paper through stencils. If you want to combine the techniques of stenciling and ink blending, this is exactly the tool you want to reach for – but you can also use this tool to apply other types of media beyond inks and paints.
Otherwise, if you’re stenciling with a thin, runny media like paint or ink, you’ll most likely want to take a different approach to applying it than what you’d use with a thicker media.
You could, for example, spray it onto your paper through the stencil. If you want to try this, I recommend getting yourself a bunch of spray bottles and using a different spray bottle to use with each color.
You can experiment with layering spritzes of different colors through the same stencil, onto the same paper. This can result in either gorgeous, sophisticated projects (if you know what you’re doing), or it can make a colossally huge mess (if you haven’t yet figured out what you’re doing). So if you’re new to this, don’t get discouraged when you make a huge mess. If you keep experimenting long enough, you’ll figure this out.
Check Out My Top Picks for Papers to Stencil On:
You can stencil on pretty much any paper if you’re using a relatively dry media like a pencil, pen or marker to do your stenciling.
Your paper choice gets to be more of an issue if you’re using wet media like sprays or Stencil Butters, because the paper has to be strong and hefty enough to withstand the media you’re applying.
If you aren’t sure which paper you want to stencil on, you might like to try my top picks as a starting point and see how you like them.
Strathmore’s Bristol Board tends to be my first choice for most wet media applications. This paper withstands spraying, inking, stenciling, watercolor painting, gouache painting, and dyeing.
Furthermore, you can just get right to it without having to waste time priming it with gesso or primer. It’s good to go as soon as you tear it out of the pad.
I LOVE Strathmore Bristol Board, and can’t recommend it highly enough!!! If you don’t already have a favorite paper for stenciling on (or, even if you do!) I recommend trying it to see if you’ll like it. If you want to learn more about it, I invite you to check out my product review of Strathmore Bristol Board, HERE.
If you don’t mind taking the time to apply gesso or primer to your paper, Neenah’s 110-lb Solar White cardstock is another fantastic choice. If you don’t already have gesso or primer in your craft supplies stash, you might also want to take a look at my top picks for primers, HERE.
Find Complementary Art and Craft Supplies From the Cosmos Infinity Collection by Stamperia
Stamperia makes an entire collection of sophisticated outer-space themed paper crafting supplies available. If you want to use this stencil for creating backgrounds that resemble starry skies, you might wish to use supplies from the Cosmos Infinity collection along this stencil. In that case, please do check out all the other coordinating supplies from the Cosmos Infinity collection. Here are some suggestions for other craft supplies that are designed to match this stencil design:
Find More Stencils and Stenciling Project Ideas:
About Your Product Reviewer: Amy Solovay is a craft blogger and educator who holds a degree in textile design. Amy learned to stencil as a small child, and she still enjoys stenciling techniques all these years later. Beyond that, she enjoys introducing other crafters to the best new craft supplies, and she also loves helping crafters learn new techniques for making the most of the craft supplies they buy.
This page was last updated on 9-30-2024.