Hiking and Nature Themed Scrapbooking Mini Album Featuring Craft Supplies by 49 and Market
Document Your Hiking, Camping and Backpacking Adventures in a Mini Scrapbook Album Featuring Nature Themed Craft Supplies by 49 and Market
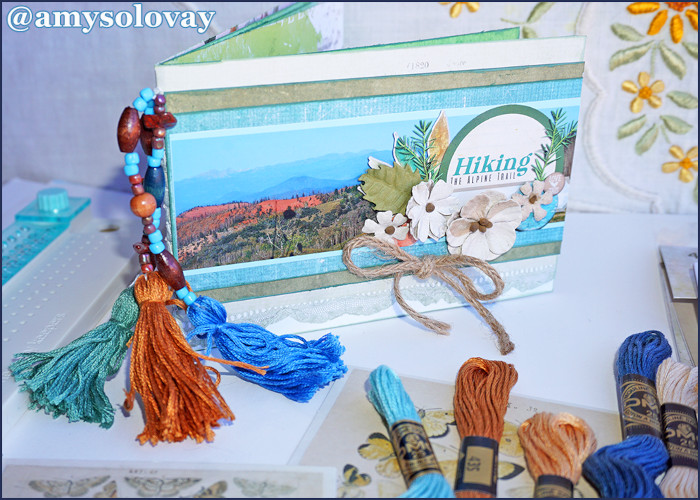
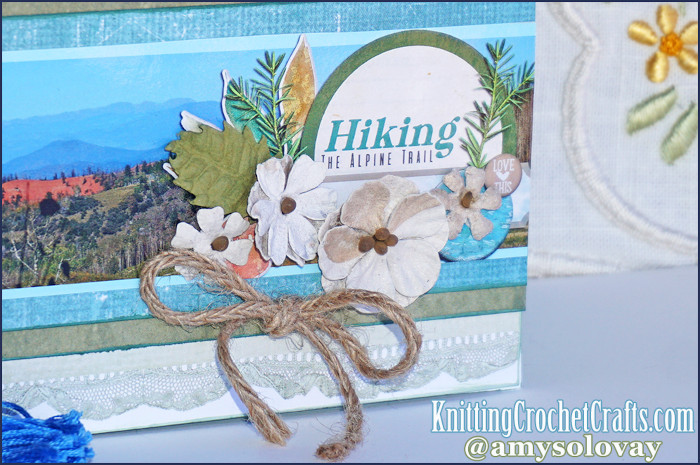
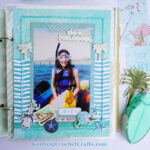
Hiking the Alpine Trail: Project Photos of This Mini Scrapbook Album
Hiking the Alpine Trail Mini Scrapbooking Album With Beaded Tassel CharmsHiking the Alpine Trail Scrapbook Mini Album — Close-Up Photo of Front CoverHiking the Alpine Trail Scrapbooking Mini Album
How to Make This Mini Scrapbook Album:
To make this mini album, you cut multiple 12″x12″ pieces of paper into 3 pieces that each measure 4″ high by 12″ wide. Then you use a scoring tool to fold each piece in half. You’ll end up with bunches of 4″ x 6″ pages.
Then you’ll stack the folded pages on top of each other in the order you want them to appear in your mini album, and you’ll stitch the binding using saddle stitch.
To make it easier to get precise, even stitches, I recommend using the We R Makers (formerly We R Memory Keepers) book binding tool. However, this is not a strict necessity; you can make this project without the tool. I do think it is really beneficial to get the tool, though, because having it will save you a lot of frustration, messed-up projects and wasted materials. I love this tool and have found it to be well worth its affordable asking price.
That gives you a basic booklet that can be embellished the way you want it. I used beads, embroidery floss, and a variety of embellishments to create my mini album. I used the following supplies to make my album, but there are many other supplies that would work for making a craft project like this one.
Craft Supplies You’ll Need for Making a Similar Nature-Themed / Hiking-Themed Scrapbook Mini Album
Cardstock and /or Patterned Papers: I used papers by 49 and Market from various collections to make the pages of my mini album. Many of the papers I used are from the Vintage Artistry Naturalist collection; I also used the Spectrum Sherbet Lime colored paper. On the covers I used the Posies paper from the Avesta collection and another paper from the Vintage Artistry Anywhere collection that has now been discontinued.
Fiber for Your Book Binding: I used DMC embroidery floss to do the saddle stitching for the binding of my mini album. You have many other options for suitable fiber or thread you can use. If you have the We R Makers Book Binding Tool, you can use the waxed thread that comes with the tool for stitching your binding. If you have never stitched the binding on a book or mini album like this before, that’s the thread I recommend because it is really easy for beginners to succeed with that particular thread.
Fiber for Your Tassels: The beaded charms are optional; you can make a perfectly lovely mini album without them. If you want to make them, you’ll need suitable fiber to use for the tassels at the ends of the charms. I used DMC embroidery floss to make the tassels at the ends of the beaded charms. You could also use crochet thread or yarn to do this if you prefer.
Beads and a Beading Needle: If you have a random assortment of beads left over from another project, this is an ideal way to use them up. If you’re buying new beads, select ones that match your photos and papers and are not overly large; smaller beads work best for this project.
Photos and Digital Elements: The front cover of my mini album is actually a hybrid that incorporates both physical and digital scrapbooking supplies. I layered the digital supplies overtop of my photo and then printed the photo and supplies together. This is an easy way to do album titles and / or photo captions so that you don’t have to hassle with hand writing, stamping or stickering them. The digital scrapbooking supplies I used are by Katie Pertiet, and I downloaded them from her website.
Embellishments: Jute Cord, Faux Flowers, Stickers, Die Cuts, Etc.
How to Make the Beaded Charms for Your Mini Album
After you’ve finished stitching the binding for your mini album, don’t cut your thread and end off. Instead, use the rest of the thread to make your beaded charms.
Embroidery floss has multiple strands that can be separated. To make your beaded charms similar to mine, you’ll want to separate the leftover threads into 3 sections. Work on one section at a time.
Thread the separated strands of embroidery floss from your first section onto the beading needle and string beads onto it.
Before you end the strand of beads, make your tassel and tie the tassel onto it.
To make the tassel, wind embroidery floss around a garment hangtag or similarly-sized piece of stiff cardboard. Tie the tassel onto the end of your beaded charm and then finish making the tassel by tying another piece of embroidery floss around the tassel.
Repeat three times so you have three similar beaded tassels.
So far, I’ve only made the front cover of the mini album. I will share more pages from the album after they’ve been completed.
Thanks so much for taking a look at this project. I appreciate your interest!
Find Free Instructions for Making More Mini Scrapbook Albums
Fall Themed Mini Album Titled Pumpkin Spice and Everything Nice Featuring Supplies by Simple Stories
Road Trip to Colonial Beach — A Travel-Themed 6×8 Scrapbooking Album Featuring Nautical and Road Trip Themed Layouts
This Is Paradise Scrapbooking Layout: Snorkeliing in Hawaii