Happy Fall Card With Cute Bears — Craft Supplies by Lawn Fawn
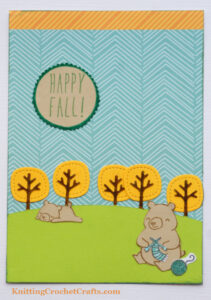
Last fall, the lovely people over at the Lawnfawnatics Blog hosted a challenge with the theme of “Awesome Autumn”! Pictured here, you can see one of my entries for that challenge; I made a card featuring cute bears, autumn trees and an expansive turquoise chevron-patterned sky. Hey, why not, right?
I’m reposting this project idea in case you missed seeing it the first time — because if you need a fall-themed card to send now, this one is a quick and easy one you might like to try.
Supplies You Will Need for Creating a Similar Happy Fall Card:
- “Den Sweet Den” stamp set by Lawn Fawn
- Lawn Fawn Simple Stitched Trees Border Die Set
- 12″x12″ Patterned Paper From the “Into the Woods Remix” Collection by Lawn Fawn
- Milo’s ABCs Stamp Set for stamping the “Happy Fall” sentiment
- Several scraps of Kraft cardstock for stamping the sentiment and the bears
- There are different ways you could cut out the “Happy Fall” sentiment to make it look like the example pictured here. You could use a scalloped circle die to do the job. Or you could use a circle template plus scalloped scissors. I opted for the circle template plus paper edgers, but you’d likely get a more even shape if you went for the die instead.
- Walnut Stain Distress Ink for stamping the bears
- Rustic Wilderness Distress Oxide Ink for stamping the “Happy Fall” sentiment, and also for inking around the outer edges of the card
- Distress Oxide Black Soot for stamping the bear’s knitting needles and ball of yarn
- Light Aqua Marker for coloring the bear’s knitting needles and ball of yarn
- Brown Marker: You might or might not need this, depending on how you use your dies. The hillside and the tree trunks can be cut in one piece; if you use bright green cardstock to do this, you’ll end up with a lovely green hillside (which you want) with vibrant, eye-catching green tree trunks (which you probably don’t want). That’s where the brown marker comes in; you can simply color over the green tree trunks to make them brown. Another option would be to use an ink blending tool and ink to color over the tree trunks.
- Dark Green Marker or Other Coloring Tool: I used a random green brush marker to color the scalloped edge around my sentiment, but there are a lot of possibilities for this; you could use a Copic marker, a colored pencil or really, any coloring media for this.
I love how this card turned out!
Over to You:
Have you been playing along with the Lawnfawnatics challenges this fall? If so, how did your cards or projects turn out?
Did you make a card similar to this one? If so, I hope it turned out well. The floor is open for comments if you have any insights to share.
Posted By: Amy Solovay