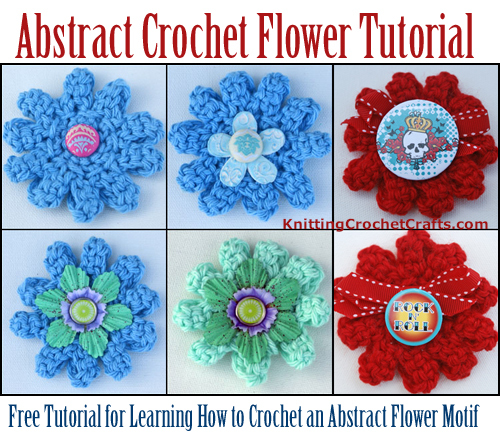
Abstract Crochet Flower Tutorial
Free Crochet Pattern and Tutorial for an Abstract Flower Motif
Some crochet flowers are designed to resemble real flowers, like roses, sunflowers or daisies. Not this one; this is an abstract flower motif, although it did occur to me that this flower could be made to look like a sunflower. This flower’s abstract appearance makes it suitable for use in a wide variety of craft projects.
Supplies You’ll Need for Crocheting This Abstract Flower Motif:
You’ll need a small amount of yarn, crochet thread, or fiber, and a crochet hook of appropriate size.
Crocheted flowers are a fantastic way to use up scrap yarn, and to experiment with different materials. You can try crocheting this flower with any fiber you like.
So far, I’ve tried crocheting this pattern with medium weight wool and cotton yarns. I like the results both ways.
You’ll also need some pretty baubles for embellishing the flower – perhaps ribbon, buttons, or jewels. Additionally, you’ll need a tapestry needle for weaving in ends. You might also need a regular needle and thread for attaching embellishments such as buttons or bows.
Gauge:
You can crochet flowers at any gauge. Your gauge will vary depending on several factors including the yarn and crochet hook you use and your own unique way of holding your materials as you crochet.
Finished Size:
My sample flowers measure about 3 inches each. The size of your finished flowers will vary, depending on the materials you choose and other factors.
Abbreviations Used in This Pattern:
- ch = chain
- sc = single crochet
- sl st = slip stitch
- st = stitch
The Crochet Flower Pattern:
Ch 4. Sl st to form a ring.
Round 1: SC in ring by working 1 ch st for the first part and then finishing the sc st as usual. Work 10 more sc sts into the ring for a total of 11 sc. Sl st to join to first sc in round.
Round 2: (Ch 9. Sc in 4th ch from hook. Work 5 more sc, one in each of the next 5 ch sts. Sc in back loop of next sc from round 1.) Repeat sequence in parentheses 9 more times for a total of 10 flower petals. Join with a sl st to the base of the first petal formed.
Round 3: In this round, you’re going to fold each flower petals forward and then secure it with a sl st. Start by folding the first petal in half. Each of the petals has a little open space in its tip. Find this space and insert your hook into the space, then through the little hole in the base of the flower itself. Work a slip stitch by grabbing the yarn with your hook, and then pulling it up through both the flower and the flower petal and the active loop on the hook. Do this for each flower petal all the way around. Join with a sl st.
Free Tutorial for Learning How to Crochet a Flower
This tutorial breaks down each step in crocheting the abstract flower. Step-by-step photos are included along with the corresponding crochet pattern instructions.
Abstract Crochet Flower Tutorial
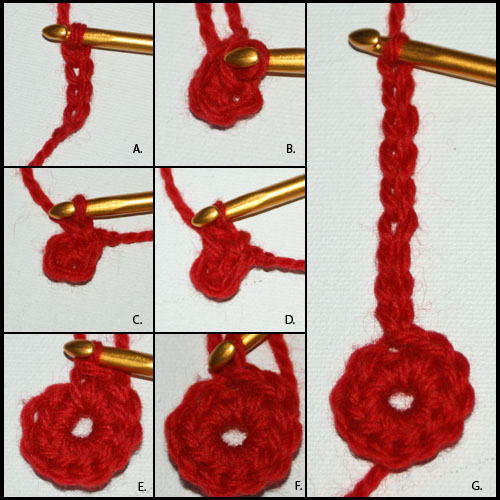
Ch 4. (View A.) Sl st to form a ring. (View B.)
Round 1: SC in ring by working 1 ch st for the first part (View C) and then finishing the sc st as usual. (View D.) Work 10 more sc sts into the ring for a total of 11 sc. (View E.) Sl st to join to first sc in round. (View F.)
Round Two of the Abstract Flower
Begin Round 2: Ch 9. (View G.)
Work a single crochet in the 4th chain from your crochet hook.
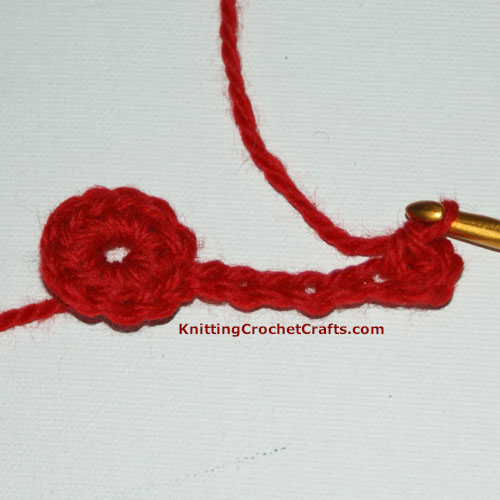
Single crochet in the 4th chain from your crochet hook.
Normally, if working a row of sc, you wouldn’t leave so many extra chains; in many cases, you’d probably work into the second chain from the hook.
There’s a reason for leaving extra chains here. It creates a small hole. The hole is not big enough that it will be noticeable in the future when you’re gazing at the completed flower. Notice that you can’t even really see it in my photo. It is, however, big enough that you’ll be able to insert your crochet hook through it when you reach the appropriate spot in round three of the pattern.
Abstract Crochet Flower Tutorial — Work-In-Progress Pictures
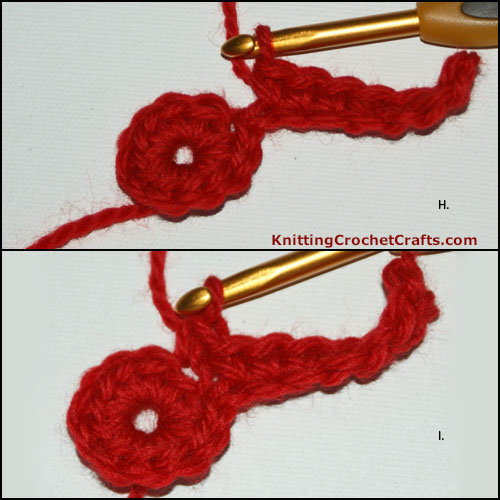
Work 5 more sc, one in each of the next 5 ch sts. (Upper photo, view H.)
Sc in back loop of next sc from round 1. (Lower photo, view I.)
Again, if you look closely you’ll see that there is a little hole formed when you do this step. The hole is created between the row of sc that branches off the first round, and the first round itself. This small hole is also going to be useful later when you work round three of the flower.
Repeat that same sequence of steps 9 more times for a total of 10 flower petals:

Abstract Crochet Flower Tutorial — Work-In-Progress Pictures
- View J shows how the piece looks after another 9 chain stitches have been crocheted.
- View K shows how it looks after working the sc in the 4th ch from hook.
- View L shows the second petal with the rest of those steps completed; so that’s two petals finished; keep working the petals the same exact way, all the way around.
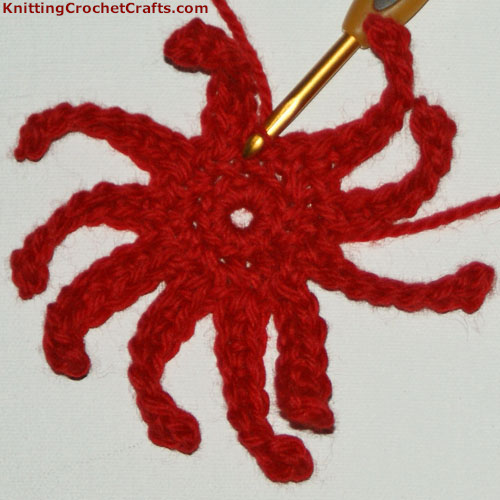
At this point, if your flower somewhat resembles an oddly-designed, malformed octopus with extra legs, you’re on the right track. (View M.)
The last step in round two is to join with a sl st to the base of the first petal formed. Round 2 of the abstract flower is now complete.
Join With a Slip Stitch to Complete Round Two.
Begin Round Three – Securing the Flower Petals
In this round, you’re going to fold each flower petal forward and then secure it with a sl st.
Each of the petals has a little open space in its tip. Find this space and insert your hook into the space, then through the little hole in the base of the flower itself. Work a slip stitch by grabbing the yarn with your hook, and then pulling it up through both the flower and the flower petal and the active loop on the hook. Do this for each flower petal all the way around. Join with a sl st.
Start by folding the first petal in half.
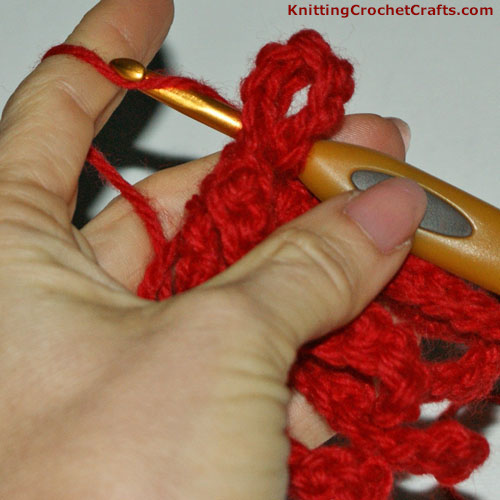
Folding and Securing the Crocheted Flower Petal – Side View
In this photo, you can see a side view of the folded petal. I’ve inserted my hook through the tip of the first petal. I also inserted it through the small hole between the base of the petal and the first round of crochet. I am in the process of grabbing the yarn with my hook to draw it up through the flower, the tip of the petal, and the active loop on the crochet hook.
First Petal Secured
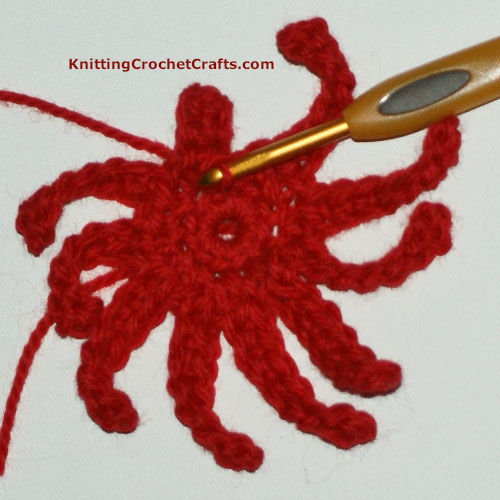
Front View of Folded Flower Petal: Here’s how it looks after the slip stitch has been completed. The first flower petal has been secured to its base. Next, repeat these steps to secure each of the flower petals, all the way around.
Round Three Is Complete
Here’s how the flower looks after all the petals have been secured, and the ends have been woven in.
I think this side of the flower is best used as the back, although that’s up to you. You could use it as the front of the flower if you prefer, but you’ll probably want to have an embellishment large enough to cover the center part.
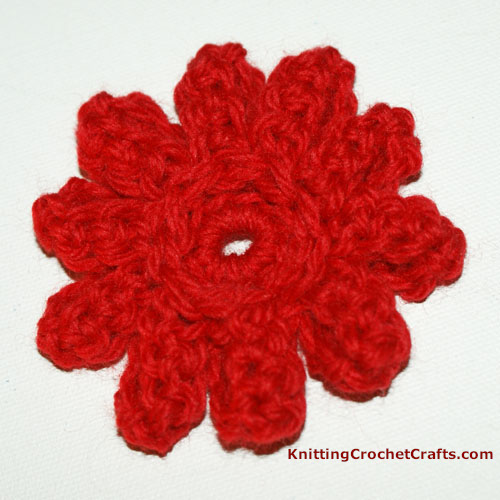
Round Three of the Abstract Flower Has Been Completed. Here’s how it looks after all the flower petals have been secured.

Completed Flower Without Embellishments: This Is the Other Side of the Flower Before Embellishments Have Been Added.
Embellishing the Crocheted Flower Motif
You can use the flower as it is, but it’ll be prettier if you embellish it. You can really let your creativity shine when you put the finishing touches – the embellishments – on your crocheted flower. There are many different possible ways to embellish these flowers.
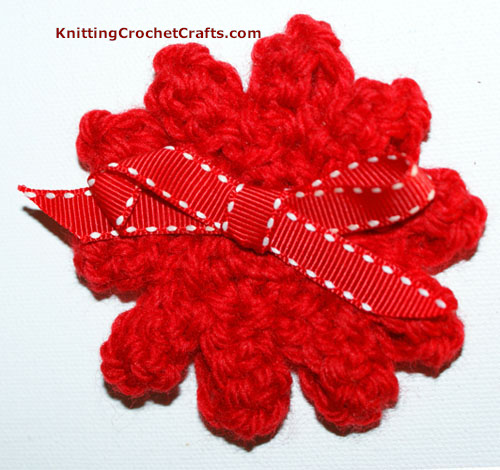
Finished crochet flower embellished with a red and white ribbon bow.
The photo above shows a simple, pretty, and inexpensive way to embellish the flower motif. I simply tied a bit of ribbon in a bow, and stitched it to the flower using coordinating sewing thread.
If I were going to use this flower to accessorize a washable item like a hat or scarf, I’d consider treating the cut edges of the ribbon with something to prevent the edges from unraveling. Aleen makes a product called “Stop Fraying” that would work, and there are other options as well.
Mixed Media Flowers
Ideas for Embellishing the Abstract Flower Motif Using Scrapbooking Supplies
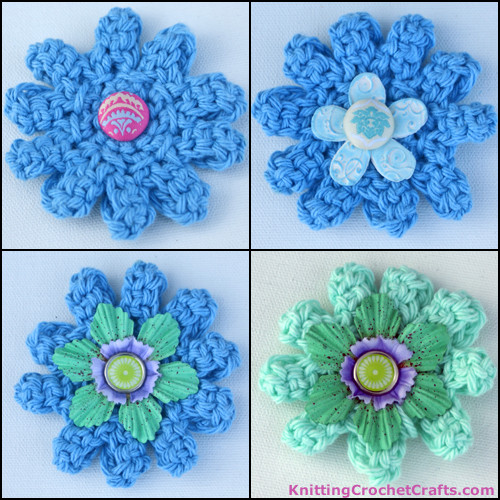
This photo shows you several more ideas for embellishing your finished flowers. The embellishments I used here are scrapbooking supplies; if you use paper flowers and metal brads such as these, the flowers will not be washable and are best used in paper craft projects or similar craft projects that do not need to be washed. I used these to decorate the covers of chipboard mini scrapbook albums. Supplies used include brads by Amy Butler / K & Company, brads by Autumn Leaves, and Painterly Petals flowers by Prima Marketing.
Ideas for Embellishing the Abstract Flower Motif Using Scrapbooking Supplies
This photo shows you several more ideas for embellishing your finished flowers. The embellishments I used here are scrapbooking supplies; if you use paper flowers and metal brads such as these, the flowers will not be washable and are best used in paper craft projects or similar craft projects that do not need to be washed. I used these to decorate the covers of chipboard mini scrapbook albums. Supplies used include brads by Amy Butler / K & Company, brads by Autumn Leaves, and Painterly Petals flowers by Prima Marketing.
I like to use crocheted flowers for decorating my scrapbooking projects. When I crochet new flowers for my scrapbooks, it only seems natural to embellish them with even more scrapbooking supplies.
Scrapbooking embellishments are not usually washable, so keep that in mind if you use them when making flowers like these. Mixed media flowers might not turn out to be washable, depending on what you use to make them. If you’d like to use any of these flowers, for example, on a hat, you could do so, but it would be best to remove the flower from the hat before you wash it.
If you need your flowers to be washable, stick to using washable embellishments such as buttons.
The ideas shown here are useful for decorating chipboard or acrylic album covers. In my opinion, they are too dimensional for using in scrapbook layouts.
Flower Shown at Top Left:
- Yarn: Worsted weight Peaches & Creme Light Blue cotton yarn
- Embellishment: A scrapbooking brad designed by Amy Butler, manufactured by K & Company.
Flower Shown at Top Right:
- Yarn: Worsted weight Peaches & Creme Light Blue cotton yarn
- Blue Flower: The blue dimensional flower is made out of Delight modeling compound. You can use any similar paperclay or modeling compound for this. To make the flower, roll out a slab of the modeling compound and stamp it with a flower-shaped stamp. The stamp I used is by Inque Boutique. Poke a hole in the center of the stamped image, and then let it dry overnight. When it is dry, cut around the flower with scissors. Then ink it with pigment ink. I used Fluid Chalk, but you can use any brand of ink you like.
- Brad: This brad was designed by Amy Butler and manufactured by K & Company.
Flower Shown at Bottom Left:
- Yarn: Worsted weight Peaches & Creme Light Blue cotton yarn
- Embellishments: A scrapbooking brad by Autumn Leaves, a Painterly Petals flower by Prima Marketing, and another flower that was a thrift store find.
Flower Shown at Bottom Right:
- Yarn: Worsted weight Peaches & Creme Baby Green cotton yarn
- Embellishments: A scrapbooking brad by Autumn Leaves, a Painterly Petals flower by Prima Marketing, and another flower that was a thrift store find.
These are just some ideas to get you started. I recommend checking through your stash of craft supplies to see if anything you already own can be used to dress up your crocheted flowers.
Then use the flower in the craft project of your choice.
More Crochet Flower Patterns
- Crochet Loom Blooms — Learn how to make flowers combining flower loom and crochet techniques.
- Find Our Picks for the Best Crochet Flower Pattern Books
More Crochet Motif Patterns
- Crochet Flower Patterns
- Crochet Heart Patterns
- Crochet Snowflake Patterns
- Crochet Motifs — Links to a whole bunch of different free crochet patterns, plus some paid patterns that are worth the money.
- Crochet Kaleidoscope — This is currently my favorite crochet motif pattern book. I’ve used this book to make bunches of different projects, and I’m planning to make bunches more.
Learn More About Crochet:
- Click here to find our picks for the best crochet books.
- Click here to find crochet stitch tutorials and instructions.
- Click here to learn more crochet techniques.
- Click HERE to Find Fabulous Yarn for Crochet and Knitting
- Click here to learn about crochet hooks.
- Click here to find my favorite crochet project bag.
Learn About Other Crafts: Knitting, Sewing, Quilting, Paper Crafts and More
- Click here to get updated on the latest craft supplies.
- Click here to learn about knitting.
- Click here to find our beginner’s guide to knitting needles.
- Click here to find outstanding craft project ideas.
Posted By: Amy Solovay
Page last updated on 1-8-2024. Thanks for visiting!