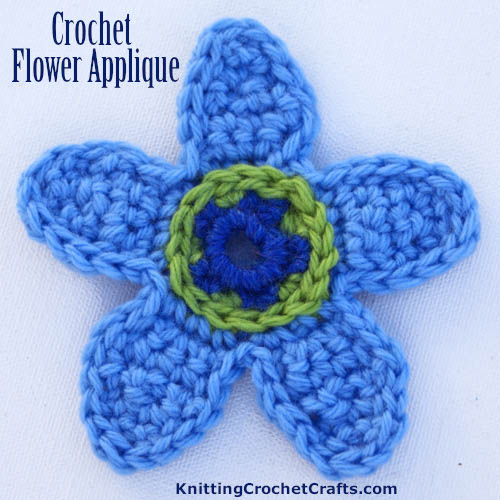
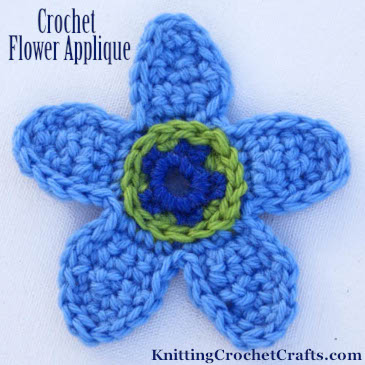
Crochet Flower Applique: Free Crochet Pattern
We’ve posted bunches of free crochet flower applique patterns here on our website. What distinguishes this one from all the others: It is multicolored, and to make it, you utilize multiple interesting crochet techniques including tapestry crochet and surface crochet slip stitches.
My sample flower is made using worsted weight wool yarn, although you can use practically any yarn or thread to create your own flowers.
Although this crocheted flower is pleasantly textured, the applique lies reasonably flat, which makes it ideal for attaching to a variety of surfaces. This flower’s primary appeal comes from the colorwork.
In addition to the free crochet pattern, you’ll find work-in-progress photos that show you how to do the color changes for the flower center.
Skill Level: Intermediate
Supplies Needed to Crochet a Flower Applique:
Yarn:
My sample is worked with Cascade 220, which is a worsted weight wool yarn.
This is a good project for using up scrap yarn. You’ll need 3 different colors of yarn:
- Color A- In my sample flower, color A is the royal blue color; its official color name is “Cobalt Heather.”
- Color B – In my sample flower, color B is the vibrant lime green color, named “Primavera.”
- Color C – – In my sample flower, color C is the light blue color, named “Robin Egg Blue.”
Feel free to substitute other colors, brands, fibers and weights of yarn when you crochet your own flower appliques.
When choosing different colors, keep in mind that the color you choose for the flower center should contrast with the other two colors you’ll be using.
Crochet Hook:
I used a size H / 5.0 mm crochet hook to crochet my sample flower, but you can use any hook that works well with your chosen yarn or thread.
Other: Tapestry Needle for weaving in ends
Finished Flower Size:
My sample flower applique measures about 4” in diameter across its widest point. Your flower measurement will vary depending on the supplies you use and other factors such as your individual style of crocheting.
How to Crochet a Flower Applique: Free Project Instructions
Abbreviations Used in This Pattern:
- ch = chain
- sc = single crochet
- sl st = slip stitch
- st = stitch
- yo = yarn over = wrap the yarn over the crochet hook
Crocheting the Center of the Flower:
You’ll be working with two different colors of yarn to create the flower center; one color will be inactive, and one will be active at any given time. There are a couple different ways you could handle the inactive yarn. You could just drop it when you’re finished with it and then pick it up again when you need it next. This will result in small floats across the back of the work. Or, you could use the tapestry crochet technique to crochet overtop of the inactive color. You won’t have floats this way, so if you want the flower to be two-sided this technique is preferable.
Using color A, Ch 5. Sl st to form a ring.
Round 1: Work 10 sc in ring. Sl st to join to first sc in the round.
At this point, your work should look something like this:
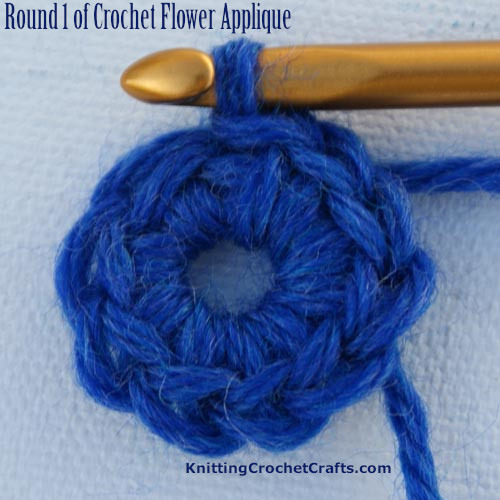
Round 1 of the Crochet Flower Applique
Round 2:
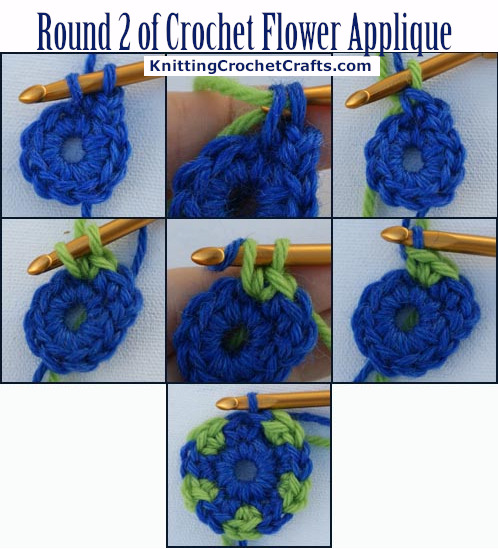
Round 2 of the Crochet Flower Applique: Step-By-Step Tutorial With Work-In-Progress Pictures Showing You How to Crochet the Flower Applique
In this round, you’re going to switch back and forth between colors A and B. Work 2 sc sts in each sc from the previous round – 2 sc in color A, 2 sc in color B, repeat all the way around for a total of 20 sc. To accomplish this, work the first sc as usual, but when you do the second sc, switch colors before you complete the stitch. (See photos above.) Sl st to join to first sc in the round.
Cut color A and end off; do not cut color B yet.
Crocheting the Flower Petals
- This flower has 5 petals total.
- Work the flower petals using color C.
- Crochet the petals directly into the last round of the center of the flower.
- Work each petal separately before starting the next petal.
- Work through both loops of each stitch.
- I suggest taking a look at a photo of the flower with petals added, before you actually start this part.
Flower Petal, Row 1: Using color C, work 3 sc in any 3 sc sts from round 2.
Ch 1, turn.
Flower Petal, Row 2: Sc in first sc, work 2 sc in next sc, sc in next sc ( 4 sc total.)
Ch 1, turn.
Flower Petal, Row 3: Sc in each sc across the row ( 4 sc total.)
Ch 1, turn.
Flower Petal, Row 4: Sc in first sc, draw up a loop in next sc, draw up a loop in following sc, then YO and pull through all 3 loops on hook. (1 decrease worked.) Sc in next sc.
Ch 1, turn.
Flower Petal, Row 5: Work 3 sc, 1 in each st across.
Ch 1, turn.
Flower Petal, Row 6: Skip first sc, draw up a loop in next sc, draw up a loop in following sc, yo and pull through all 3 loops on hook.If working one of the first 4 petals, end off and weave in the loose end. For petal #5, do not end off.
Begin the next flower petal by attaching color C to the flower center, leaving one st in between each petal.
When you’ve worked all 5 petals, it will look like this:
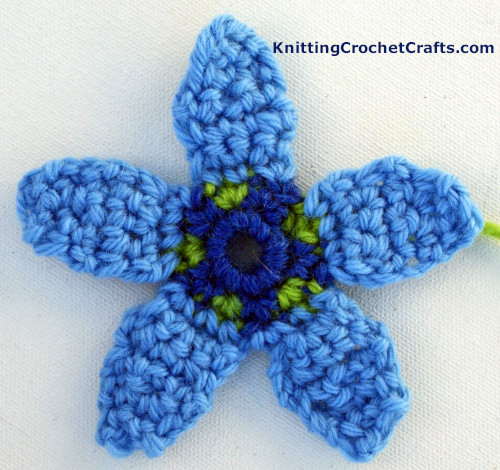
The Crochet Flower Applique Before Surface Crochet Details Have Been Added
Slip Stitch Outlines
To make the flower center “pop,” pick up color B and work a round of sl sts around the outer perimeter of round 2. To get a better idea of how this will look when it’s complete, you can check out this photo comparison:
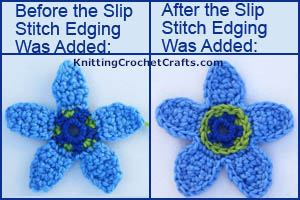
Crochet Flower Applique Before and After Slip Stitch Details Have Been Added
You might also wish to view this tutorial about how to do surface crochet slip stitches. End off.
Then pick up color C where you left off, and add slip stitches around the outer edges of your flower petals too. This isn’t going to be a precise process; there isn’t any obvious formula for where to put each stitch. Think freeform crochet here.
Try to place your stitches as evenly and carefully as possible, keeping them close to the outer edges of the flower petals. This will tidy up the crooked-looking edges nicely so the outer edge of your flower has a smooth, uniform look.
When you’ve worked sl sts all the way around, pull the loop left on your hook through your first sl st to the back of the work, then cut the yarn and end off.
Weave in all your loose ends securely using a tapestry needle.
So there you have it: That’s how to crochet a multicolored flat flower applique. How will you use your flower? If you crocheted this motif, please be sure to leave me a comment letting me know how it turned out.
Happy crocheting!
Crochet Flower Applique: Free Crochet Pattern
Find Even More Crochet Flower Patterns
- Daisy Crochet Patterns
- Sunflower Crochet Patterns
- Our Picks for the Best Crochet Flower Pattern Books
Learn More About Crochet:
- Click here to find our picks for the best crochet books.
- Click here to find crochet stitch tutorials and instructions.
- Click here to learn more crochet techniques.
- Click HERE to Find Fabulous Yarn for Crochet and Knitting
- Click here to learn about crochet hooks.
- Click here to find my favorite crochet project bag.
Learn About Other Crafts: Knitting, Sewing, Quilting, Paper Crafts and More
- Click here to get updated on the latest craft supplies.
- Click here to learn about knitting.
- Click here to find our beginner’s guide to knitting needles.
- Click here to find outstanding craft project ideas.
Posted By: Amy Solovay
Page last updated on 6-15-2021. Thanks for visiting!