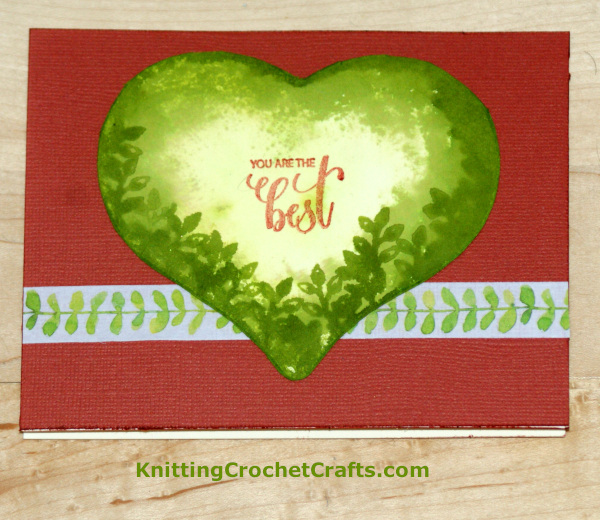
You Are the Best Hand Stamped Greeting Card Using Stamps and Inks From Gina K Designs; Greeting Card Design Is by Amy Solovay.
On one hand, I love ink pads in pretty colors — all of them. On the other hand, up until now, dye ink really hasn’t been my favorite. I’m a devoted pigment ink fan, for a number of reasons I won’t get into in detail here. Dye ink has its place, and I own bunches of dye ink pads — but most of the time, when I do a new stamping project, I tend to reach for a pigment ink as my first choice.
That changed this month, thanks to a fun challenge from Gina K Designs that I tried.
I had no idea there was such a thing as “water reactive dye ink”, and that this type of ink can be used like watercolor paints to achieve beautiful, soft layered effects. Gina K pointed out that there are multiple things you can do with this ink to take advantage of its water reactive aspects:
- You can create a blended ink background and then squirt it with water to create an eye-catching water droplet effect.
- You can also mix the ink with water and then paint with it just like you would paint with watercolors.
- You can apply ink to your stamp as you ordinarily would, and then spritz a small bit of water onto the stamped design before stamping. This creates a variegated watercolor effect that can be quite enchanting, depending on your design. I found this idea to be especially interesting with background stamps.
I had a couple of other ideas beyond the ones Gina suggested above:
- You can mix the ink with water (or not) and put it in a water brush pen. The ink goes a lot further if you add water to it, and you can create all kinds of interesting watercolor-y washes and layered effects using this method.
- You can dilute the ink with water and dribble the watered-down ink onto an ink-blending tool like this one. Then you can apply it to paper either on its own or with a stencil.
I used both of the above techniques to make the card you see pictured above. The watered-down ink blends beautifully when you apply it this way. Then you can stamp the same color at full strength for a lovely tonal effect.
The water reactive dye ink is exactly the kind of ink that the folks at Gina K Designs are offering for sale, so I just had to try it for myself. I bought 2 colors of the ink: “Jelly Bean Green” and “Cherry Red”. I also got a set of stamps that includes some imagery by Gina K Designs. This stamp set is called “Thinking of You” by the Stamping Village. The Stamping Village is a group of competing stamp vendors who collaborated to create several versatile and unique stamp sets. Gina K Designs contributed the lovely plant imagery and the “You Are the Best” sentiment stamp I used to create this card design.
I used these items together to experiment with making bunches of different stamped, inked and “watercolored” elements to use in my paper craft projects. It was a ton of fun, and I learned quite a bit from this challenge. I’m seeing dye ink in a new light, and thanks to this challenge, I like it better than I ever did before.
Pictured above is the first card I finished using these techniques. I love it! There will be many more to come!
Gina K Designs Products You’ll Need to Create a Card Like This One
- Jelly Bean Green Dye Ink Cube (which is a small ink pad).
- Jelly Bean Green Reinker
- Cherry Red Dye Ink Cube (which is a small ink pad).
- Gina K sentiment stamps of your choice; I used a sentiment stamp by Gina K Designs for the Stamping Village “Thinking of You” stamp set that says “You Are the Best.”
Other Craft Supplies You’ll Need for Making This Card:
- A spongy ink blending tool
- Washi tape: I used a pretty plant-themed washi tape by Recollections to make the sample project.
- Cardstock: I used Bazzill cardstock for the card top and Tim Holtz Heavystock for the card base. The paper I stamped, inked and watercolored onto is also Heavystock. There are many different papers that would work well for making a mixed-media, wet / watery project like this one.
- A water brush pen
- A heart template is optional, but useful. It’s also possible to freehand draw a heart and cut it out.
- Paper trimmer
- Scissors
I love the way this card turned out, and I can’t wait to make more paper craft projects using these techniques.
Thanks for checking out my card design. I hope you’re having a lovely and creative day! Best wishes,
Amy
More Card-Making Ideas Featuring Stamps and Supplies by Gina K Designs
More “Inky” Card-Making Ideas
- 4 Ink Blending Techniques for Card Making and Paper Crafts: Tutorials Plus Project Ideas
- DIY Watercolor Floral Greeting Card With Ink Blending
- Hello Greeting Card Featuring Simple Flower Motif, Ribbon Bow and Ink Blending
- Hand Stamped Floral Birthday Card Making Idea Featuring Ink Blending
- Floral Bouquet Birthday Card Making Idea Featuring Ink Blending and Glitter Washi Tape
Posted By: Amy Solovay
This page was last updated on 8-27-2022.