Crochet enthusiasts can have as much fun with color mixing as artists do. Want to see an example of how this is possible? Check out this free, easy pattern for color mix afghan stitch crochet potholders.
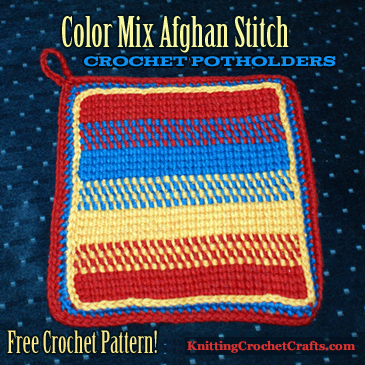
Color Mix Afghan Stitch Crochet Potholders: Free Pattern
In my experience, afghan stitch lends itself particularly well to color mixing experiments. That’s because you can crochet the forward pass and the return using 2 different yarns; and when you do that, the colors visually blend together in a way that’s quite interesting.
In my project sample, you can see stripes of solid-colored yarn. In between the solid stripes, you see color-blended stripes that you create by alternating colors in the forward and return passes. It’s soooo easy to do, and the results look super cool; you get the illusion of several other colors being created within the design. I invite you to try it for yourself; I think you’ll have a lot of fun with this technique.
Related Resources: How to Afghan Stitch: Free Tutorial | All About Tunisian Crochet | Crochet Potholder Patterns | Kitchen Patterns
Supplies You’ll Need for Crocheting These Potholders:
Yarn:
You’ll need 3 different colors of worsted weight wool or cotton yarn (DO NOT USE ACRYLIC!):
- Red
- Yellow
- Blue
I used Knitpicks Simply Cotton worsted to crochet my project sample. Unfortunately, the colors I used have been discontinued:
- Carnelian Heather
- Golden Heather
- Bermuda Heather
I LOVE and highly recommend the Knitpicks yarn colors for this project; but in case you can’t find them, I now recommend substituting Cascade 220 wool yarn in this pattern. Cascade 220’s expansive color palette ensures you’ll be able to find fantastic color choices for your potholders, whether you want to make them in red, yellow and blue as pictured here, or whether you want to try using colors that match your kitchen’s color scheme. Wool is ideal for making potholders, because it doesn’t easily burn. If you accidentally catch it on fire, the flame will go out.
Crochet Hooks
For the Body of the Potholder: You’ll need a size J / 10 /6.0 mm afghan crochet hook measuring 10+ inches long, or your preferred size.
For the Edging: An ordinary J hook is a good starting point, but you may need to adjust up or down if you notice a significant difference in tension between the body of the potholder and the edging. I used a size H hook to crochet the edging for the sample potholder.
Other Materials: Tapestry needle and safety pins
Abbreviations
- ch = chain
- ea = each
- sc = single crochet
- sl st = slip stitch
- st(s) = stitch(es)
Potholder Dimensions
Each potholder measures approximately 8 1/2 inches square.
Gauge
11 stitches = 3 inches. The row gauge isn’t critical for this project.
Pattern Notes
- Afghan stitch has a tendency to curl up, so don’t stress if your work curls. The potholder will lie flat once you join the two pieces of it together.
- Striped patterns such as this one can generate lots of loose ends to weave in. If you’d rather not deal with excessive amounts of loose ends, don’t bother cutting the yarns when you work the two-color rows; just drop the yarns when you are finished with them, and pick them up again when you need them next.
How to Crochet the Potholder:
Front of Potholder:
Ch 28.
Work in afghan stitch until directed otherwise.
Rows 1-4: Crochet these rows using red yarn.
Row 5: Work the forward pass in red, and the return pass in yellow.
Row 6: Work the forward pass in yellow, and the return pass in red.
Row 7: Work the forward pass in red yarn, and the return pass in yellow.
Row 8: Work the forward pass in yellow, and the return pass in red.
Rows 9-12: Crochet these rows using yellow yarn.
Row 13: Work the forward pass in yellow, and the return pass in blue.
Row 14: Work the forward pass in blue, and the return pass in yellow.
Row 15: Work the forward pass in yellow, and the return pass in blue.
Row 16: Work the forward pass in blue, and the return pass in yellow.
Rows 17-20: Crochet these rows using blue yarn.
Row 21: Work the forward pass in blue, and the return pass in red.
Row 22: Work the forward pass in red, and the return pass in blue.
Row 23: Work the forward pass in blue, and the return pass in red.
Row 24: Work the forward pass in red, and the return pass in blue.
Rows 25-28: Crochet these rows using red yarn.
Row 29: Work one sl st in ea vertical bar all the way across the row. Work one last slip stitch into the end of the row, in the same spot you’d ordinarily work the last afghan stitch in the row. (27 slip stitches worked.)
Weave in all the loose ends before crocheting the edging.
How to Crochet the Edging for the Front of the Potholder:
Round 1: Attach blue yarn and Ch 2. Sc in ea stitch, all the way around. When you get to the corners: (sc, ch 2, sc) and then continue working sc. At the end of the round, join with a sl st.
Decorative Slip Stitch Detail:
Using yellow yarn, work a round of surface crochet slip stitches on the face of the potholder. Your guideline for placing these stitches will be the spot where the single crochet touches the afghan stitch.
After you’ve worked sl sts the whole way around the potholder, end off and weave in the loose ends. Set aside and work the back of the potholder.
Back of Potholder:
Working in red yarn, ch 28. Work 28 rows of afghan stitch.
Row 29: Work one sl st in ea vertical bar all the way across the row. Work one last sl st into the end of the row, in the same spot you’d ordinarily work the last afghan stitch in the row. (27 slip stitches worked.) Do not end off yet.Edging for Back Piece of Potholder: The edging is worked in the round.
Ch 2. Sc in ea st, all the way around. When you get to the corners: (sc, ch 2, sc) and then continue working sc. At the end of the round, join with a sl st. Weave in all loose ends.
How to Finish the Potholder:
Edging Round 2: You use this round to join the two pieces of the potholder together. Place the wrong sides of the potholders together. Be sure that you hold both the top edges together, as there is one stitch less on the top than the bottom. You can safety-pin the corners of the squares to help you hold them together as you join them.
Using red yarn, draw up a loop and ch 2. Working through the front and back loops of both squares, sc in ea st, all the way around. When you get to the corners: (sc, ch 2, sc) and then continue working sc. When you get to the last corner of the round, ch 12 to make the hanging loop for the potholder. Then join the hanging loop to the body of the potholder with a sl st.Edging Round 3: Work 1 sl st in ea sc all the way around. When you get to the corners, work a sl st into the ch-2 corner space. When you’ve worked sl sts all the way around the potholder, end off, leaving a tail of yarn at least 6 inches long.
Weave in the end carefully using a tapestry needle. Your work will be visible, so do it neatly.
Enjoy your new potholders!
Crochet the Matching Dishcloth
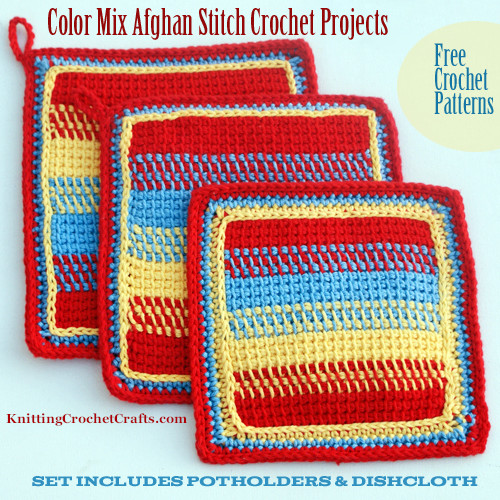
Color Mix Afghan Stitch Crochet Projects: Kitchen Set With Potholders and Dishcloth
These potholders are part of a matching kitchen set that also includes a dishcloth. Get the free crochet dishcloth pattern HERE.
Find More Fantastic Crochet Potholder Patterns
- Visit Our Main Directory of Knit and Crochet Potholder Patterns
- Pretty Afghan Stitch Crochet Potholders: Free Pattern
Make More Kitchen Accessories
Posted By: Amy Solovay
This page was last updated on 8-16-2023.