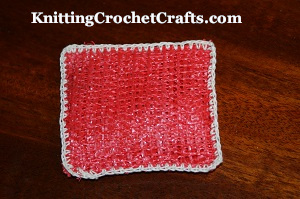
Upcycled Mesh Pot Scrubber With Crocheted Edging
Enjoy This Free Crochet Scrubbie Pattern and Instructions
Crochet Pot Scrubber: Free Pattern
If you’re looking for a useful, fast, frugal and practical crochet project, consider making this quick pot scrubber. It’s an eco-friendly idea you can use for recycling produce bags that would otherwise get trashed. It’s also an ideal project for using up small bits of mystery crochet thread that you might not otherwise have much use for. The resulting pot scrubber is cheaper than one you’d buy at the store, and it works just as well.
Time Required:
This is a quick project; all together, my sample pot scrubber took about 15 minutes to make.
Skill Level:
This pattern uses only single crochet, slip stitch and the chain stitch — and in theory it should be an easy crochet pattern. But, all things considered, I’d say that it’s probably more of an “intermediate” pattern; you’ll be crocheting through several layers of a material that can be a little challenging to work with. Once you get started, it isn’t difficult, but I wouldn’t recommend this as a first crochet project.
Craft Supplies You’ll Need to Make a Pot Scrubber:
Orange Bag or Produce Bag: I recently bought a 25 lb bag of oranges at my local farmer’s market. The oranges were packaged in a lovely plastic mesh-like bag, which I did not want to throw away. My sample pot scrubber was made out of a piece from this orange bag. This material forms the main part of the scrubber.
Crochet Thread: My scrubber is held together using stitches crocheted from a short length of mystery crochet thread. You’ll need a small amount, sufficient for crocheting a round of single crochet stitches around the outside of your scrubber. If you have short, unidentified odds and ends of crochet thread hanging around in your stash, this is the perfect way to use them up. I’m guessing I used size 10 crochet thread, but it doesn’t matter too much what size thread you use.
Crochet Hook:
I used a size 7 /1.65 mm steel crochet hook. When you choose your hook, make sure to use a size that is appropriate for your chosen crochet thread; if you’re using a size 3 crochet thread or embroidery floss, you’ll want to choose a larger hook. If you’re using a finer crochet thread, you’ll want to choose a smaller hook.
Gauge:
Gauge is not critically important for this pattern. I ended up with a gauge of about 7 stitches per inch, but your gauge is likely to vary depending on the materials you use. For this particular project, please don’t worry about matching my gauge exactly; it’s more important to be concerned with using the correct size hook to make your crochet stitches fit well with the materials you’re using to make your scrubber.
Finished Size:
My finished scrubber measures approximately 3 inches by 2 1/2 inches.
Pot Scrubber Instructions:
Using the orange bag, cut a strip measuring approx. 6 inches by 18 inches.
Fold the strip lengthwise into almost-thirds, with the center portion measuring slightly more than the sides, approx. 2 1/4 inches. Then fold it in the other direction in 3 inch increments, with the shorter sides being folded into the inside, so that the rough edges are buried inside the scrubber.
You now have a neat little stack that you’re going to secure around the edges using crochet. To accomplish this, you’ll be crocheting through the little mesh holes in the bag. Grab your crochet hook and attach your crochet thread in a corner using a slip knot.
There’s no set-in-stone place that you have to crochet; you’re going to kind of just wing it, inserting your hook into whatever spot looks best for crocheting a stitch.
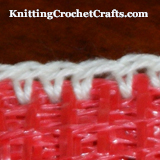
Close-Up of the Crochet Stitches on the Pot Scrubber
For my project, it was easy to work a single crochet stitch in every mesh hole all the way around the outer perimeter of the piece. If it’s easy for you to do the same, then do that; when you get to a corner, work two chain stitches to turn the corner and then resume working your single crochet stitches. Be sure to work through ALL the layers. It’s not the end of the world if you miss a layer that’s buried somewhere in the middle, but overall it’ll be better if you can secure them all.
If your crochet thread is too large or your bag’s mesh holes are too small for you to work through every one, then work through every other one, or maybe even every third one.
If your mesh holes are too large, meaning that there is too much space between stitches if you only work one stitch through each hole, then you can try working 2 single crochet stitches into each mesh hole. Feel free to use your creativity here, because there are limitless other ways you could approach this. If you have to, you can work one stitch through some mesh holes and multiple stitches through others; or you could skip some meshes and work through others if you need to. The goal is really just to use your crochet stitches to secure the layers of material all the way around. Keep in mind that this doesn’t have to be dazzlingly beautiful; it just has to be a functional scrubber. (Although it’s great if you can manage to make it beautiful, of course.)
When you’ve crocheted all the way around the piece, join the end of the round to the beginning with a slip stitch. Then cut your thread and weave in your end. The scrubber is now ready for use.
More Kitchen Craft Projects:
- Free Crochet Scrubbie Patterns
- Placemat Patterns
- Coaster Patterns
- Dishcloth Patterns to Knit and Crochet
- Potholder Patterns to Crochet
More Useful Crochet Resources:
Learn About Other Crafts: Knitting, Embroidery, Quilting, Card Making, Kids’ Crafts and More
- Check Out Must-Have Craft Supplies.
- All About Knitting.
- Craft Organizers
- Knitting Needles
- Click here to find outstanding craft project ideas.
Posted By: Amy Solovay
Page last updated on 6-27-2021. Thanks for visiting!