Learn How to Crochet a Wire Bracelet With This Free Tunisian Crochet Pattern and Instructions
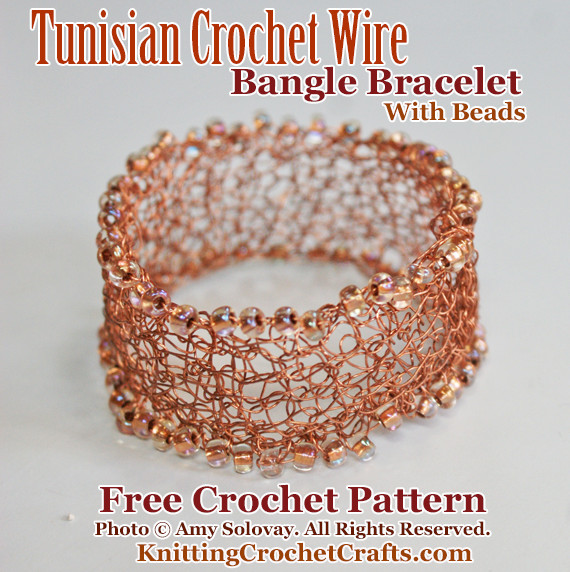
Tunisian Crochet Wire Bangle Bracelet With Beads: This Bracelet Incorporates Three Different Crochet Techniques: Tunisian Crochet, Wire Crochet and Bead Crochet.
Related Resources: Crochet Bracelet Patterns | Free Jewelry Patterns | Crochet Accessories
About This Project:
One of my goals for KnittingCrochetCrafts.com: I want it to be a comprehensive resource on the topics of knitting and crocheting. With that in mind, I am working on writing tutorials for every knitting and crochet technique I know how to do.
As I have been writing my crochet technique tutorials, I started thinking about all the possibilities for combining the techniques to create even more interesting projects. For example, I love Tunisian crochet — and I also love wire crochet. What if I were to try doing Tunisian crochet with wire?
So that’s how this project came to be. I decided to make a small Tunisian crochet project using wire. A bracelet seemed like a project that would be well-suited to this sort of technique, so that’s what I decided to make.
In the end, this actually ended up being a combination of three different techniques. I decided to embellish the bracelet with some beads, so I used the bead crochet technique in addition to the others.
Before I get on with posting the bracelet instructions, I think it’s a good idea for me to share a few words about the wire crochet + Tunisian crochet process. I found it extremely challenging. Perhaps it would get easier with practice, but so far I’ve found it frustrating and difficult — much more so than either technique of wire crochet or Tunisian crochet on its own.
Specifically, I found it difficult to make my loops large enough to work through; I also found it challenging to keep an even tension throughout. At times, I even found it difficult to locate my vertical bars.
Overall, this is a challenging project.
While I do like this bracelet quite a bit, I think it could be improved on.
If you decide to try this project, you should understand upfront that your results may not be worth the effort — because it is not easy to achieve good results with the project. I’m not completely satisfied with my own results; I think I’d need to remake this design a few more times before I get it perfect.
When I was finished this bracelet, my hands were aching and my fingers were screaming for mercy. I DO NOT recommend this project to anyone whose hands are less than 100% healthy. If you have arthritis in your hands, any kind of repetitive stress disorder, or any other condition that makes your hands tire easily, this is not the project for you. It’s not worth it. And for everyone else, please proceed with extreme caution. If your hands get tired at any point while you’re working on this project, stop and rest them until they’ve fully recovered.
I also don’t recommend this project to you unless you thrive on chaos and love a challenge. Consider yourself warned.
Materials Needed to Make a Bracelet Like This One:
Wire: 26 gauge craft wire in the color of your choice. I started with a 24 yard spool of wire, and there’s plenty left over to use for making something else.
Beads: 6/0 glass seed beads. I used 78 beads in my sample bracelet, but you are likely to need a different number of beads.
Crochet Hooks: You’ll need a Tunisian crochet hook and a regular crochet hook. I used a 3.5 mm Tunisian crochet hook, and a vintage crochet hook of unknown size, but I think it’s close to the same size as my Tunisian hook — perhaps a bit smaller. You might have better results with a different size hook, so feel free to experiment and make some practice pieces to see what feels comfortable for you.
Other: Wire cutters and a tapestry needle
Gauge: Gauge is not important for this project.
Finished Size:
My bracelet turned out smaller than I would have liked. It measures about 7 1/4 inches in circumference; about 2 3/8 inches in diameter.
How to Crochet the Band for the Bracelet:
There are different ways you could approach the task of crocheting this bracelet. In the following instructions, I explain how to re-create the bracelet I made, exactly as I made it. Perhaps these instructions could be improved on; before you make a bracelet like this, I invite you to read through the instructions, think through them and feel free to modify them if you wish. Perhaps you’ll get better results by using a bigger hook, or thinner wire, or making some other variation that would improve the outcome.
String your beads onto your wire and push them way down the length of the wire. You won’t need them until after you get the bracelet band completed.
Using your wire and your standard crochet hook, chain 6. Switch to your afghan hook.
Work in afghan stitch until the bracelet band is the length you want it to be.
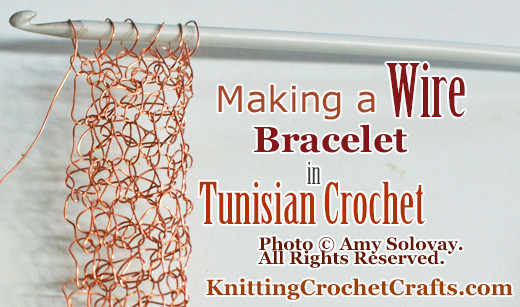
Making a Wire Bracelet in Tunisian Crochet
How to Do Bead Crochet Along the Edges of the Bracelet:
When the band is the length you want it to be, join the top and the bottom of the band together with a slip stitch.
The next step is a little tricky to describe, but not complicated to do once you get why you’re doing it. When you work with beads, in many cases the beads pop out on the back of the work. Since you aren’t going to want beads on the inside of your bracelet, what you want to do next is situate the work so that the inside of the bracelet is facing you, and the outside of the bracelet becomes the back of the work. To get to this point, I had to remove my hook from my work, insert it again the other way, and wiggle the working end of wire around to a different spot.
Then work beaded slip stitches all the way around the edge of the bracelet. Here’s how to do it:
*slide a bead until it rests against the bracelet, close to your active loop. Insert your crochet hook into the work and pull up a loop, trapping your bead inside the stitch.* Repeat the sequence in between asterisks until you’ve worked all the way around the edge of the bracelet.
Manipulate your active loop, wire and hook so that you can work from the outside of the piece. Join the ends of the bracelet together using ordinary slip stitch — without beads.
Manipulate the active loop, wire and hook yet again so that you go back to working from the wrong side of the bracelet. Your next goal is to add beads all the way around the other edge.
When you’re finished, end off and hide the ends of your wire. To accomplish this, you can thread the ends onto a tapestry needle, same as you would with a piece made of yarn. Or you could just manipulate the wire with your fingers to put it where you want it. I find it easier to use the needle, but either way should work fine.
Use wire cutters to cut off any excess wire.
The bracelet is now ready to be worn, or to give as a gift. Enjoy!
More Wire Crochet Projects
- Wire Crochet Napkin Rings
- Bead Crochet Wire Napkin Rings
- Wire Crochet Christmas Wreath Ornament
- Crochet Snowflake With Wire, Beads and Crochet Thread
More Crochet Jewelry Projects
- Crochet Bracelets
- Crochet Bead Necklace Pattern
- Wire Crochet Bangle Bracelet
- Fabric Crochet Necklaces
Posted By: Amy Solovay
This page was last updated on 7/25/2023.