Also Known as “Sewing in Ends.”
When you finish a knitting or crochet project, you’re left with at least two loose, dangling pieces of yarn, thread or fiber: one at the beginning, and one at the end. If your project involves bunches of color changes, or piecing different squares or motifs together, you’ll be left with even more loose ends than that — perhaps dozens or even hundreds of them.
You have to deal with these ends somehow. In some cases, you’ll want to weave them seamlessly and securely into your crochet or knitting project. There are sometimes other, smarter ways of dealing with them, which we will also explore.
End-weaving is one of those finishing techniques that can make or break your project. You won’t want the ends to be visible, and you also don’t want them to come sneaking back out of the project later. Most of all, you don’t want your project to come unraveled.
However, there are about a zillion different ways you could correctly approach the above objectives. So we’ll discuss multiple ways of doing this.
Are you ready to learn how to weave in your ends on a crochet or knitting project? Let’s get started!
Use Your Ends for Seaming:
Both knitters and crocheters can use this handy technique: when you’ve finished any part of a yarncraft project that requires additional seaming or stitching, you can use the loose ends as your thread, neatly taking care of both tasks at the same time. A few examples:
- You’re crocheting a granny square afghan, and you’ll need to stitch your grannies together. Crochet a granny square, then leave the last end loooong, and then in the end you can use it to stitch the square to its nearest neighbor.
- You’re knitting a sweater, and you just finished a sleeve. Again, leave a long, long tail at the end, and use it for sewing the seam.
- You’ve knitted or crocheted an applique. Leave enough of a tail at the end to attach the applique to whichever item you want to sew it to.
- You’ve knitted or crocheted a fingerless glove that needs a side seam. I typically use both ends to do my seaming in this case; I use one end to seam from the wrist or arm area to the lower thumb, and the other loose end to stitch from the finger opening to the upper thumb area.
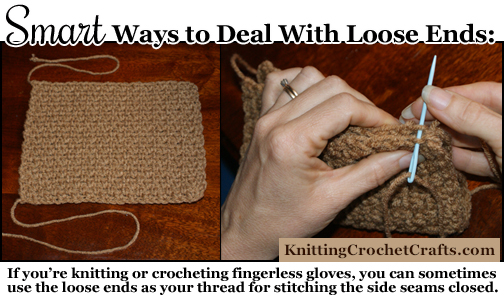
Smart Ways to Deal With Loose Ends: When knitting or crocheting fingerless gloves, sometimes you can weave in your loose ends and stitch your side seams at the same time.
Instructions for Weaving in Ends in Crochet
There are some different ways you could approach the task of weaving in the loose ends on a crochet project. Some of them involve sewing in the ends using a needle, usually a tapestry needle, yarn needle or darning needle which has an eye that’s big enough to have yarn threaded through it. Some approaches involve using a crochet hook, usually a smaller crochet hook than what you used to crochet the project — but sometimes the same crochet hook.
When I weave in my ends on a crochet project, I use a combination of two different techniques, particularly to weave in the end at the beginning of the project.
Weaving in the Ends, Then Crocheting Overtop of Them
If there’s any crochet to be done after the end has been created, I weave the end into the following row, then I crochet overtop of it.

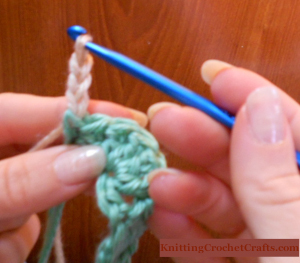
Crochet Shell Stitch, With Row 1 Completed
I’ll demonstrate this while crocheting a small swatch of basic shell stitch. In the picture posted above, you can see how row 1 of my shell stitch sample looks. I will be crocheting the second row in a different color, and the color change produces a couple of loose ends.
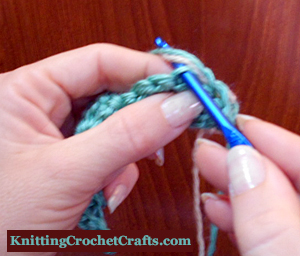
Starting Row 2 of Shell Stitch in A Second Color. This Color Change Created a Loose End That Needs to Be Woven in.” class /> Starting Row 2 of Shell Stitch in A Second Color. This Color Change Created a Loose End That Needs to Be Woven in.
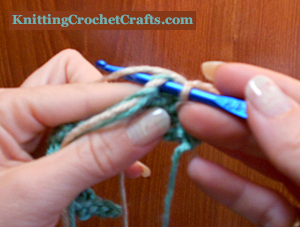
In the next picture, you can see that my color change has been completed, and I’ve worked the turning chain to begin row 2. However, before I proceed with the rest of the row, I’m going to weave in the ends I just created when I changed colors.
When you do this on your own projects, you can use a safety pin or a locking stitch marker to hold your active loop temporarily while you drop it and work on your end-weaving.
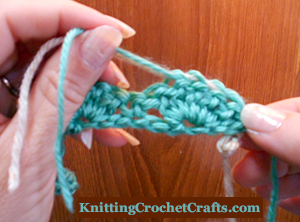
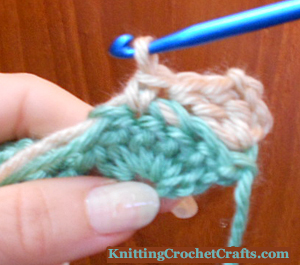
Neatly, Carefully Pull the Loose Ends Through the Piece of Crochet Several Times, Working Through the Stitches That You Will Crochet Into When You Do the Next Row.
In the next photo, you can see this in action.
Right about now, I should mention that I think it’s preferable to use a tapestry needle or yarn needle for this; you thread the ends of yarn onto your needle, and then you can use the needle to sew the ends right into the piece. For this to work well, you’ll need to leave long enough lengths of yarn — at least 6 inches — so you have enough length to work with.
I’m generally happier with my results when I take the time to find and use a needle, although sometimes I don’t feel like getting up to look for one — which is why you see me doing this part with a crochet hook in the pictures here.
You can see that I’ve inserted my hook into the piece, and I’m grabbing the two loose ends and pulling them through the piece. I’m working through the stitches that I will be crocheting overtop of when I work the next row. Crocheting overtop of them will help to secure the stitches, making the ends more secure than they would have been otherwise.
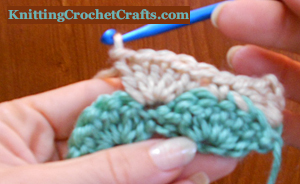
Weaving in Ends in Crochet — Work In Progress
If I’m weaving in an end at the beginning of a piece, I usually weave the ends into a few stitches into the row, as pictured here. Then I crochet overtop of them, and complete the row. Then I might weave a little more into the back of the work and into some stitches in the next row, going in the other direction. I do this to make the work more secure. The ends are less likely to get pulled out if they’ve been woven in multiple directions.
Working a Single Crochet Stitch Overtop of the Woven-In Ends
The next few photos show me getting back to the crocheting. In the picture above, you can see that I’ve inserted my hook into the next stitch to be worked — right overtop of the woven-in ends. It’s going to be a single crochet stitch…
Crochet Shell Stitch, Row 2 in Progress
…so here’s how the finished single crochet stitch looks.
Crochet Shell Stitch, Row 2 Work in Progress
And here you can see how I’ve worked a bit more overtop of the woven-in ends.
This method works well most of the time, but not always:
- It doesn’t work for the very last end in any piece — because you won’t be crocheting over that one.
- It doesn’t always work with lacy stitches, open mesh stitches or stitches that have bunches of open areas. You’re likely to be able to see the ends, which is bad; and the weaving might not be secure enough — also bad.
In either case, you’ll probably want to use the traditional end-weaving method.
The Usual Way to Weave in Ends in Crochet:
Thread a tapestry needle, yarn needle or darning needle with the loose end you wish to weave in (or “sew in.”)
How you approach the next part is a matter of individual preference; everyone seems to have their own opinions about the best way to do this part. I like to insert the needle into the closest stitch, typically piercing it from right to left, in the center of the stitch and parallel to the front and back loops of the stitch. I might stitch through a couple more adjacent stitches in this way, then change directions and go up or down a row and sew in the opposite direction. I usually change directions a few times.
I’m right-handed; left-handed crocheters might be more comfortable working from left to right.
I also like to weave in enough of the length of the end that, if it somehow does manage to pop out, I would have enough of it left to work with that I could weave it back in again.
Don’t Skimp on the Length You Leave for Weaving Your Ends In.
When I was a new crocheter, it seemed wasteful to me that I was leaving so much extra yarn. So once I decided that I would leave less, so as not to “waste” all those inches that I could be using in another project.
I learned my lesson with that experiment. No matter what I did, I couldn’t get the ends to stay woven into the piece. It didn’t help that it was a granny square with lots of color changes and open areas. The time I spent on the square was wasted; it wasn’t usable in the blanket I was making, because of those skimpy ends.
I hope you’ll learn from my mistake there, and be able to avoid that time-wasting pitfall in your own crochet. I’ve since talked to many crocheters with similar stories, and I know that lots of us have learned this expensive lesson at the “school of hard knocks.” Hopefully you’ll now be able to skip that particular lesson.
Avoid Creating Loose Ends With the Join-As-You-Go Crochet Technique
If you minimize the number of loose ends you create, obviously you’ll end up with fewer ends that need to be woven in later. This is ideal when you can manage it, and it’s manageable more often than you might think.
One obvious spot you can cut down on your loose end generation: when you crochet bunches of solid-colored motifs, instead of stitching them all together at the end, you can use the join-as-you-go method for creating a solid motif-based fabric.
If you’re interested in learning more about this technique, I recommend reading Seamless Crochet Motif Patterns, posted at Knittingcrochetcrafts.com.
How to Weave in Ends in Knitting
I have several knitting projects on my needles, and next time I weave in a loose end, I’ll be taking some pictures to show you a few different ways to do it. In the meanwhile, I’ll talk you through a couple of them.
Use a Tapestry Needle / Yarn Needle / Darning Needle: You can sew the ends into the back of the work on a knitting project, same as you can with a crochet project. The main considerations are the same: the ends shouldn’t be visible, and the work has to be sufficiently permanent.
With delicate knits, you do have to worry about the ends making visible puckers or uneven places in the work. Weaving ends into the back works particularly well for textured work such as cabled pieces. The ends seem to disappear easier if it’s a bulky piece you’re working with, but the technique can be successful for projects knitted in many different yarn weights.
One tip to keep in mind: use the smallest needle that is sufficient to hold your yarn or thread. You don’t want giant needles piercing ultra-fine, delicate knitwear.
Duplicate Stitch End Camouflage: If you’ve knitted a project using stockinette stitch, you can thread a tapestry needle, yarn needle or darning needle with your yarn end, and then use it to embroider duplicate stitches on either the front or back of the work.
Carry Loose Ends Up the Sides: When you’re knitting stripes of colorwork, you don’t always necessarily need to cut yarns between colors. Sometimes you can loosely strand the yarn along the selvedge of the knitted piece — particularly if it will be hidden inside a seam when the project is complete. For example, this could possibly work for the side seams on some knitted sweaters and jackets.
More Basic Knitting and Crochet Instructions:
- How to Start Crochet
- How to End Off in Crochet
- Knitting and Crochet Techniques
- Free Crochet Tutorials
Knitting and Crochet for Beginners
By Amy Solovay
This page was last updated on 7-12-2021.