Crochet Slip Stitch to Form a Ring
When looking at a crochet pattern, have you ever been confused by instructions to “join with a slip stitch to form a ring” or “join w/ sl st to form ring”? What do these directions mean?
In crochet, “slip stitch to form a ring” is a series of stitch instructions that indicates you’ll most likely crochet in the round to make your project. It’s a method of getting your crochet project started. Once you’ve made this ring, you can then work crochet stitches into it and build the project outward from there. This sort of ring is a beginner-friendly way to start a crochet project, as it can be much easier to hold onto a ring than it is to hold onto a straight foundation chain.
The ring method of starting works well for crocheting circles, doilies, granny squares, flowers, hexagons, triangles and similar crochet motifs where you begin working in the center of the crocheted piece.
Let’s take an in-depth look at what, exactly, you have to do to make this ring as directed.
Often, the instructions to “join with a slip stitch to form a ring” will directly follow another set of instructions to crochet a specific number of chain stitches. For example, your pattern might say something like “Ch 5, join with sl st to form ring.”
“Ch” is the abbreviation for “chain”; in other words, this means you’ll begin by crocheting 5 chain stitches immediately before you create the ring — or whichever number of chain stitches is specified in your crochet pattern.
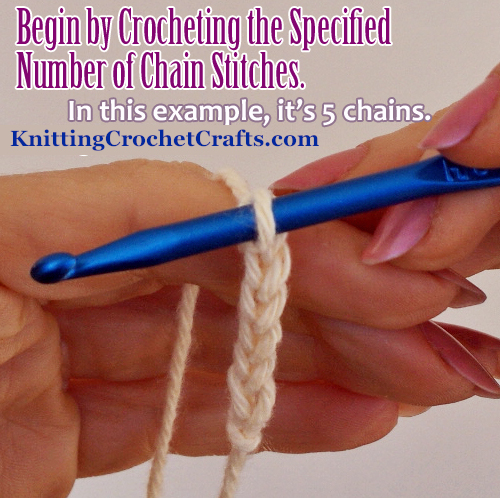
ch 5 — Chain 5 — Work 5 Chain Stitches in Crochet
In the photo above, you can see how the 5 chain stitches look when they are completed. If you don’t know how to work chain stitches yet, you can check out our step-by-step crochet instructions for the chain stitch.
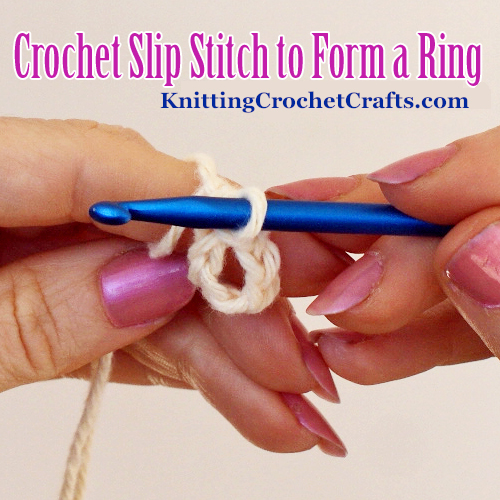
Next, you’ll want to take the chain stitches you’ve crocheted and bend them into a ring. To close the ring, you’ll work a slip stitch into the very first chain stitch you made at the beginning. The steps to do this are as follows:
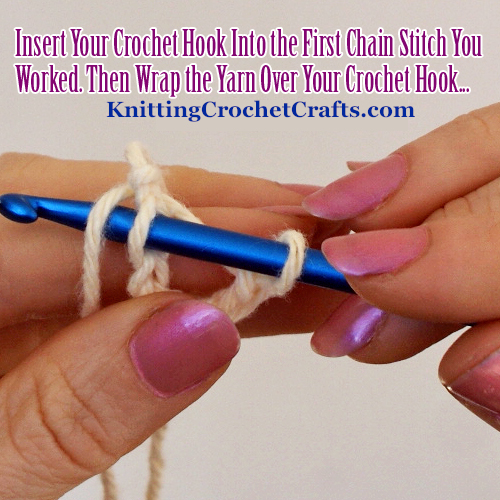
Begin the Slip Stitch by Inserting Your Crochet Hook Into the First Chain You Worked.
- Insert your crochet hook into the first chain stitch you made.
- Wrap the yarn over your crochet hook.
- Grab the yarn with your hook, and pull it through the chain stitch.
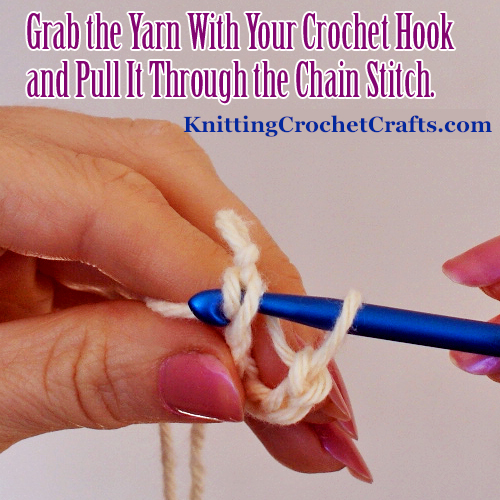
Crocheting a Slip Stitch — Crochet Slip Stitch in Progress
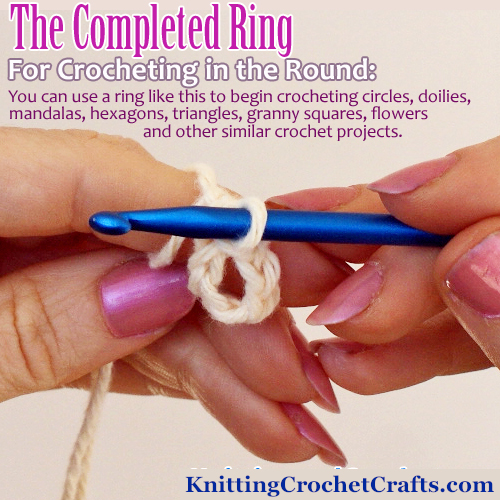
The Completed Ring — Use It for Crocheting in the Round to Make Projects Such as Circles, Doilies, Mandalas, Granny Squares, Hexagons, Triangles, Flowers and Many Others
More Info About Crochet Slip Stitches
This tutorial gives you an example of one possible use for crochet slip stitches. There are many other possible ways to use this versatile, basic crochet stitch. If you want some more ideas, check out our page on the topic of crochet slip stitch.
Slip Stitch Crochet Fabric — Learn how you can use one of the most basic crochet stitches — the unassuming slip stitch — as the basis for crocheting exquisite, versatile fabrics.
How to Join Crochet
If you just performed an internet search for “how to join crochet” and a search engine directed you here to this page, don’t worry — we do have pages that will help you with that. Take a look at the following resources for more information:
- How to Whip Stitch
- How to Join Granny Squares
- Seaming Techniques for Knitting and Crochet
Related Resources
- Best Crochet Books for Beginners
- How to Start Crochet
- Crochet for Beginners
- Beginner Crochet Patterns
- Crochet Stitches
- Crochet Circle Patterns
- Crochet Granny Square Patterns
- Double Crochet Instructions
- Half Double Crochet Instructions
- Treble Crochet Instructions
More Basic Crochet Stitches and Techniques for Beginners
Learn More Crochet Stitches:
More Crafts, Hobbies and DIY Projects:
- Craft Supplies
- Knitting
- Knitting Supplies
- Knitting Techniques
- Yarn for Knitting and Crocheting
- Sewing
- Guide to Basic Hand Sewing Stitches
- Kitchen Crafts
- Home Decor Crafts and DIY Project Ideas
Check Out More Craft Techniques and Project Ideas HERE!
Posted By: Amy Solovay
This page was last updated on 9-4-2021.