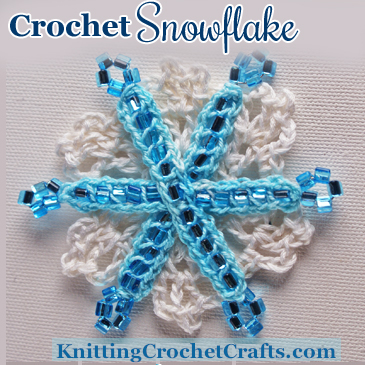
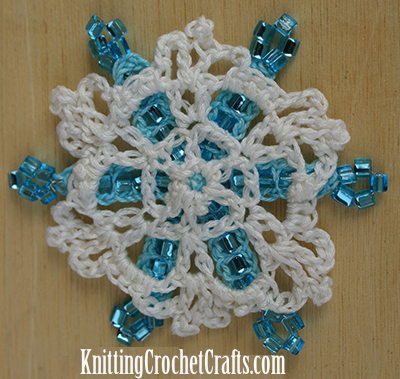
Crochet Snowflake Ornament Pattern (With Picot Stitches)
A Christmas tree ornament is one of the likeliest uses for this pretty crocheted snowflake shape. Pictured at above left, you can see how the snowflake looks before you add a wire hanger to it to complete the ornament.
Unlike most crocheted snowflakes, you wouldn’t have to use starch or glue solutions to stiffen this design to make it into a suitable Christmas tree ornament. Because you use a bit of craft wire when you make this project, the snowflake holds its shape well all on its own.
While this snowflake makes a rockin’ Christmas tree ornament, that isn’t the only possible way you could use it. If you apply a little imagination, I am positive you could think of dozens of other interesting uses for it. Off the top of my head, here are several more things you can do with the finished snowflake:
- Hot glue a magnet to the back of the piece to create a locker magnet or refrigerator magnet.
- Use it to embellish the cover of a scrapbook album. I attached my beaded snowflake to the cover of a tiny snowflake-shaped scrapbook mini album. You can see a picture of that above, on the right hand side of the photo. If you want to know how to make a scrapbook like the one you see pictured, free instructions for that are available here on our website.
- Use it to embellish your Christmas gifts.
- Applique it to a Christmas stocking, purse, shopping bag, or hat.
- Affix jewelry findings to the back to create a pin, brooch or other interesting custom jewelry piece.
- Crochet several of these and attach them to your window to create the look of a fanciful winter scene.
- Throw a tablecloth over your table, put a centerpiece in the center, and then sprinkle the table with several of these lovely snowflakes.
- Crochet several snowflakes to use as stocking stuffers for everyone in your household.
Supplies You’ll Need to Crochet the Snowflake Christmas Ornament:
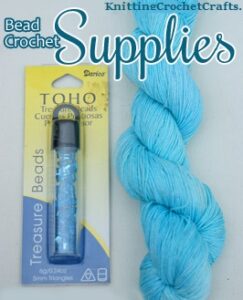
Supplies I Used for Crocheting the Upper Layer of the Snowflake Christmas Ornament: Darice Triangle-Shaped Beads Plus Hand-Dyed Crochet Thread. Not Pictured: Wire, Crochet Hook and the Embroidery Floss I Used for Crocheting the Lower Layer.
- Wire; in the sample snowflake, I used silver-colored craft wire by Darice.
- 61 Beads; in the sample snowflake, I used 5mm Darice’s triangle-shaped Toho Treasure beads measuring 5 mm. You can experiment with many other types of beads in this project.
- Two different colors of crochet thread or embroidery floss. These should contrast in color, yet complement each other. For the upper layer of my sample snowflake, I used a hand-dyed aqua-colored vintage cotton crochet thread that I estimate to be a size 10. For the lower layer, I used a skein of vintage white embroidery floss.
- A crochet hook that’s a compatible size for working with the threads or flosses you selected. I used a size 6 / 1.80 mm steel crochet hook to crochet the sample snowflake.
- A Tapestry Needle.
Tips for Choosing Materials
- Choose compatible beads and wire; the beads have to have large enough holes to be able to string on the wire. Very thick wire or very small seed beads are not ideal for this project.
- The wire you work with for this project should be thin enough to flex easily, but not so wimpy that it will easily break on you.
- The thread or yarn you choose shouldn’t overwhelm the beads. You’ll want the beads to be visible, not hidden under the fiber.
- This is an ideal project for using up scrap thread.
Size of the Finished Snowflake Christmas Ornament:
My finished snowflake measures approximately 3 1/4 inches in diameter. The white background measures approximately 2 3/4 inches in diameter. The size of your finished snowflake will vary, depending on the materials you use and your individual way of crocheting.
Pattern Notes:
You’ll crochet this snowflake in two layers. Use wire, fiber and sparkly beads to form the upper layer, and the yarn or thread of your choice for the lower layer.
The crochet technique used in this project is different than the usual bead and wire crochet technique. Instead of using the wire as your crochet medium, you crochet overtop of it as pictured in the tutorial below. Click here to find a free tutorial for learning the technique.
Instructions for Making the Snowflake Arms Using Wire, Beads and Crochet Thread
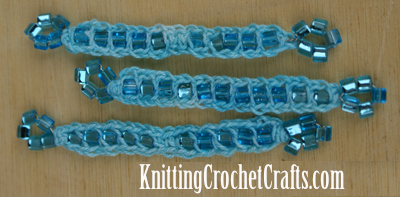
The Snowflake Arms Before Assembly
[
Here you can see a photo of how the snowflake’s “arms” look before assembly. You’re going to be making three arms all together; there are 2 different variations of the arms. The only difference: the uppermost arm has one additional bead in the center.
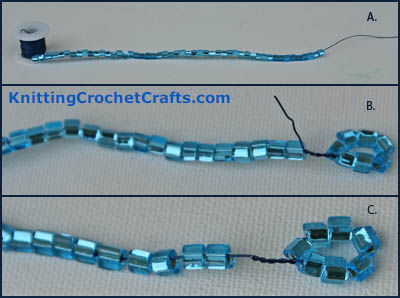
How to String the Beads for the Crochet Snowflake Christmas Ornament
Important Note: The photos show the general idea of what to do, but the bead counts in the photos are not exact. For best results, I recommend using the bead counts from the written pattern rather than the photos.
Beginning Steps to Crochet a Snowflake Ornament With Wire and Beads
String 20 beads onto the craft wire. (See view a above.) Do not cut the wire off the spool yet.
Make a Beaded Loop: — Using 5 beads, make a loop similar to the one shown in views B and C above. Twist the wire several times to close the loop. Then cut off the extra end of wire. When you begin crocheting in the next step, you can cover this bit with crochet work and beads.
Using the aqua colored size 10 crochet thread, make a slip knot and place it on your crochet hook. See view D, below right.
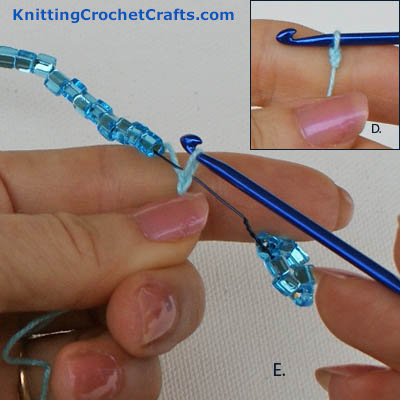
Make a slip knot and place it on your crochet hook. (View D.) Position the slip knot under the wire so that your first stitch will secure the thread to the wire. (View E.)
Position the slip knot under the wire so that your first stitch will secure the thread to the wire. (See view E.) Chain 2; the first chain counts as 1 single crochet, and the second chain will go overtop of the first bead to help secure it.
Slide the first bead right up next to your chain stitches. Single crochet on the other side of the bead, in between it and the next bead on the string.
(Work one chain stitch. Then slide another bead right beside your previous single crochet stitch, and work another single crochet on the other side of it.) Repeat sequence in parentheses 3 more times. At that point, you will have worked 5 beads all together.
Center of Snowflake Arm — Next, work 3 consecutive single crochet stitches without any beads. This is to create a space in the center where the other snowflake arms can be joined.
Work the Next 5 Beads — (Work 1 chain stitch overtop of the next bead, then work 1 single crochet stitch on the other side of the bead – between it and the next bead.) Repeat 4 more times. Work 2 chain stitches for turning.
Ignore the Unworked Beads — You should still have 5 unworked beads hanging around on your spool of wire. Eventually, they’re going to become another loop like the first one you created. For now, don’t worry about them.
Flip the Work Over — Ordinarily, when working a row of crochet, you’d turn the work over and work back across the row. In this case, you’re not going to do that; you’re going to actually flip the work upside down, so that the bottom becomes the top and the top becomes the bottom.
After you’ve flipped the work, secure your thread to the wire by making one more chain stitch overtop of the wire.
Working the Other Side of the Next 5 Beads — (Work 1 chain stitch overtop of the next bead; then work a single crochet stitch after the bead.) Repeat the sequence in parentheses 4 more times.
Finishing the Center of the Snowflake Arm — Work 3 more single crochet stitches to finish off the center.
Finish The Snowflake Arm — (Work 1 chain stitch overtop of the next bead; then work a single crochet stitch after the bead.) Repeat the sequence in parentheses 4 more times. End with one more single crochet stitch.
Camouflage any wire that is showing by either sliding the beadwork closer to the beaded loop, or else by wrapping the ends of the thread over the wire. End off, and weave in the loose ends.
Make Another Beaded Loop — Now’s the time to go back to those 5 unworked beads and make another loop. Cut the wire, leaving yourself enough space to twist the wire over itself. Aim for a snug fit; don’t leave any space between the beadwork and the loop. After you’ve formed the loop, cut off the excess wire.
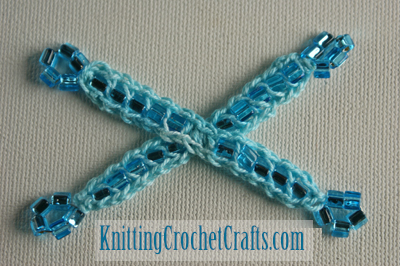
Make Another Arm, and Stitch Them Together
Your next task is to duplicate the arm you just made. Then, using a tapestry needle and a scrap of the same color of crochet cotton, place one arm on top of the other one, forming a modified X as shown. Stitch the two snowflake arms together.
You Can Use a Bead Crochet Technique to Create the Snowflake Arms
Make One More Snowflake Arm
The snowflake needs one more arm. Use the same directions given above, with one change: Instead of working 5 beads and then stopping in the center to work 3 single crochet stitches, you’re going to work a bead in that spot.
That means, when you begin, you need to string 21 beads onto the wire instead of 20.
After you’ve worked the third arm, stitch it on top of the others as shown.
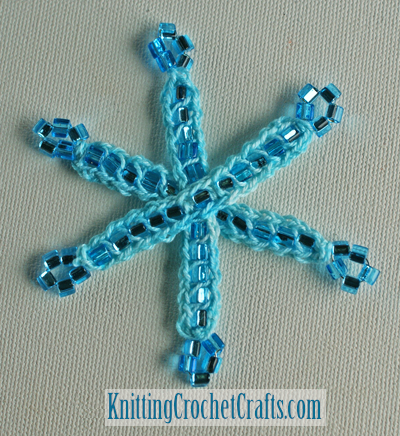
The Upper Layer of the Crochet Snowflake Christmas Tree Ornament
Instructions for How to Crochet the Snowflake’s Lower Layer
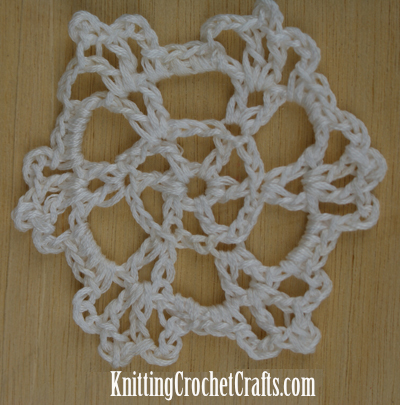
Lower Layer of Crochet Snowflake Christmas Ornament
Use the white embroidery floss and the size 6 steel crochet hook to crochet the lower layer of the crochet snowflake Christmas ornament.
Crochet Abbreviations Used in These Instructions:
- Ch = Chain
- Dc = Double crochet
- Rnd = Round
- Sl st = Slip stitch
- St = Stitch
Special Crochet Stitch: Picot
Picot = Ch 3, sl st in 3rd ch from hook.
Starting Chain:
Ch 5. Work a slip stitch to form a ring.
Rnd 1: Ch 5, (dc, ch 3.) Repeat sequence in parentheses 5 times. Sl st to join.
Rnd 2: Ch 7, (dc in next dc, ch 1, dc in same dc, ch 4.) Repeat sequence in parentheses 5 more times. Dc in next dc at the base of the first ch-7. Ch 1, sl st to join to the 3rd ch in the rnd.
Rnd 3: ch 1, (work 4 sc in next ch-4 space, ch 3, dc in next ch-1 space, work a picot, dc, ch 3.) Repeat sequence in parentheses 5 more times. Sl st to join to the first sc in the rnd.
Optional Loop for Hanging the Snowflake Christmas Ornament
If you want to hang up your snowflake, there are different ways you could do it. You could stick a wire Christmas ornament hanger through one of the loops to use as a hanger. Or you could crochet a loop for hanging up your snowflake:
Work 1 sl st, then work as many chains as necessary to make your loop the desired length. Sl st to join, then work 1-2 more sl sts to anchor the loop and make it sturdy.
My snowflake was made without a loop, because I am using it to embellish the cover of a scrapbook album.
Finishing the Snowflake
End off. Weave in the loose ends. Block if desired.
Stitch the beaded snowflake arms onto the snowflake background.
If you stitch carefully using white embroidery floss, your snowflake will be reversible. This photo shows what the back of the snowflake looks like.
Here’s How the Back of the Crochet Snowflake Christmas Ornament Looks.
If you want to use this motif as a Christmas tree ornament, you can simply add a wire ornament hanger to it to complete the project.
So there you have it: That’s one possible way to make a crochet snowflake Christmas ornament.
Get More Christmas Patterns:
Big Book of Christmas Crochet, Published by Annie’s
- Crochet Snowflakes Step-By-Step
- Unique DIY Christmas Ornaments to Make
- Christmas Patterns
- Bead Crochet Christmas Napkin Rings
- Free Beading Patterns for Christmas
- Winter Patterns to Knit and Crochet
More Holiday Cheer:
Crochet Snowflakes Step-By-Step Book
- Check out our knitter’s and crocheter’s gift guide.
- Find more patterns for holidays and special occasions.
- Find more Christmas craft projects.
This page was last updated on 9-5-2021.