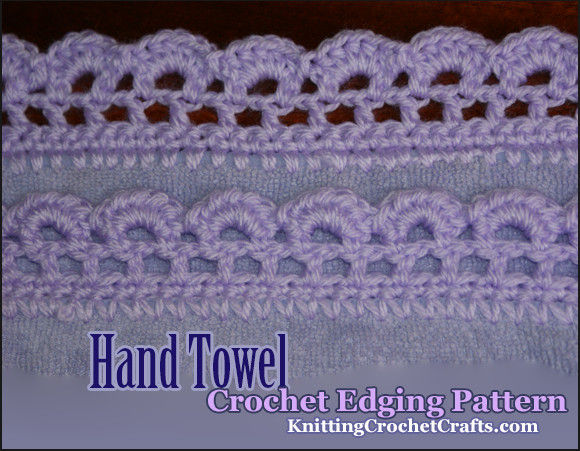
Hand Towel Crochet Edging Pattern
Would you be surprised if I told you that I bought this pretty hand towel at the 99 cent store? At first glance, it looks too fabulous to be a 99 cent store find — since I added luxurious crocheted embellishments onto the towel edges after I brought it home. I love how crochet can make even the cheapest of cheap linens look stylish and high-end.
I’m so delighted with how this design turned out that I thought I would share the free towel edging pattern with y’all. You’re invited to use it if you have any towels you’d like to finish off, (or feel free to grab it if you just want to add another pretty edging pattern to your pattern archive. They do come in handy.)
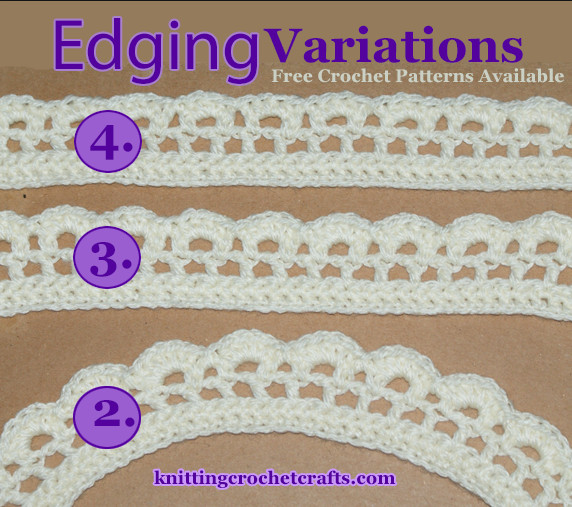
Crochet Edging Variations. The Main Difference Between These Versions Is in Row 5.
This is a versatile pattern that has many uses, and can be adapted in many ways. It’s appropriate for use on many different sorts of linens, garments and projects.
Please note that I have not yet worked out any corner instructions for this design, so I do not recommend it for use on blankets or placemats (unless you want to get inventive and come up with a solution for working the corners…)
Crochet Skill Level: In theory, this is an easy crochet pattern. At least, all the crochet work is easy. What isn’t necessarily so easy: integrating the crochet work with fabric (if that’s what you want to do) to create a finished piece. You don’t have to work the edging onto fabric; you could work it on a crocheted piece if you want to.
Important Design Notes: Before you get started, there are a few things I’d like to explain to you.
The first thing: with this pattern, it’s really easy to start off narrower than you finish. This can be a good thing or a bad thing, depending on what it is you are trying to do.
It’s a good thing if you want to create an edging for a curved piece such as a round tablecloth, a circle centerpiece, or maybe even a round doily. (See variation #2 pictured above for an example of this.) It’s a bad thing if you are trying to make a straight-across edging for a sheet or other piece.
So far, I’ve observed that this sort of curving is likelier to happen if you start off with a crochet hook that’s on the small side for the project you are working on, and if you crochet the first few rows tightly. I think it also probably depends somewhat on the materials you use, and your unique way of crocheting.
If your goal is to use this edging on a towel, flat sheet, pillowcase or other straight-across surface, you may have better success if you work your first few rows at a loose, easy tension. If that fails, you can modify row 5 to have fewer half double crochet stitches.
Stitch Multiple:
The correct stitch multiple depends on how you want to start off.
To Crochet into Embroidery Stitches: You’ll start off by working embroidery stitches in a multiple of 4 + 3.
To Crochet Directly into the Fabric: Start off by working the first row of single crochet stitches in a multiple of 4 + 3. When working single crochet stitch directly into fabric, I often find that I need to stab the fabric with my hook, grab the yarn, pull it through and then work an extra chain stitch at the beginning of the row to get the piece started and secure the work.
To Work into an Already-Crocheted Piece: Your piece should be a multiple of 4 + 3 stitches. If it isn’t, but it’s close, you can work the first row of single crochet stitch and, at the same time, increase or decrease as necessary to get to the right stitch multiple.
To Begin With a Starting Chain: You’d want to work a multiple of 4 + 4 stitches.
Supply List:
- Ideally, you’ll want to have a project to finish off — although it’s possible to crochet this pattern, beginning with a starting chain, without having one in hand. I originally wrote this border pattern to finish off a loosely woven hand towel or rectangular piece of fabric in a 14″ width. Since then, I have revised and expanded the pattern to make it flexible enough for finishing off many different sorts of items, not limited to just a towel.
- You’ll need yarn or crochet thread of an appropriate size to use on your project. In all four of the examples pictured above, I used Bernat Softee, which is considered a light weight yarn. However, you are not limited to this size / weight of yarn to achieve success with your project.
- Crochet hook of appropriate size to achieve the correct gauge. To finish the towel pictured above, I used a 4.25 millimeter / size G hook to crochet most of the edging, although I started out using a small steel hook to complete the first row.
Row Gauge: Don’t worry about it whatsoever.
Stitch Gauge: You can work this pattern at any gauge you like, unless you want to finish off a towel that’s exactly the same size as the one pictured above. In that case, I suggest the following gauge: Measuring across the first two rows, 4 inches should equal about 15 stitches.
First Row: Use stitch multiple info given above to determine how to get started, and then work your first row in single crochet stitch. Chain 1 to turn.
First Row, Variation #1 (Hand Towel Edging:) You can either crochet into the fabric using a small, sharp crochet hook, or you can first embroider either blanket stitch or chain loops into the towel. Either way, your goal is to make 51 single crochet stitches across the edge of the towel to complete row 1; then work 1 chain stitch for the turning chain.
Second Row: Single crochet across the entire row. At the end of the row, work 4 chains; these chains will count as the first double crochet plus the first chain in the third row.
Third Row: Skip 2 single crochet, then work a double crochet in the next single crochet stitch. (crochet 1 chain stitch, skip the next single crochet stitch, work one double crochet in the next single crochet stitch.) Repeat the instructions between parentheses () across the rest of this row. If you’re working on the hand towel as pictured above, this will give you a total of 26 double crochets and 25 chains, including the stitches in the turning chain. Your totals will be different for other sorts of projects.
Chain 1 to turn.
Fourth Row: Single crochet in the first stitch. (crochet 3 chains, skip the next chain, then single crochet in the next double crochet.) Repeat the instructions between parentheses () across the rest of this row. Chain 1 to turn.
Fifth Row, Variations 1 and 2: (slip stitch in the next chain-3 space. Then work 5 half double crochet stitches in following chain-3 space.) Repeat the instructions between parentheses () across the rest of this row. Work a slip stitch into the last chain-3 space, then work another slip stitch into the last stitch in the row.
Fifth Row, Variation 3: (slip stitch in the next chain-3 space. Then work 4 half double crochet stitches in following chain-3 space.) Repeat the instructions between parentheses () across the rest of this row. Work a slip stitch into the last chain-3 space, then work another slip stitch into the last stitch in the row.
Fifth Row, Variation 4: (slip stitch in the next chain-3 space. Then work 3 half double crochet stitches in following chain-3 space.) Repeat the instructions between parentheses () across the rest of this row. Work a slip stitch into the last chain-3 space, then work another slip stitch into the last stitch in the row.
Fasten off. Sew in your ends using a yarn needle, tapestry needle or darning needle.
Use these instructions to finish off both the upper and lower edges of the hand towel.
See Also:
This page was last updated on 4/30/2023.