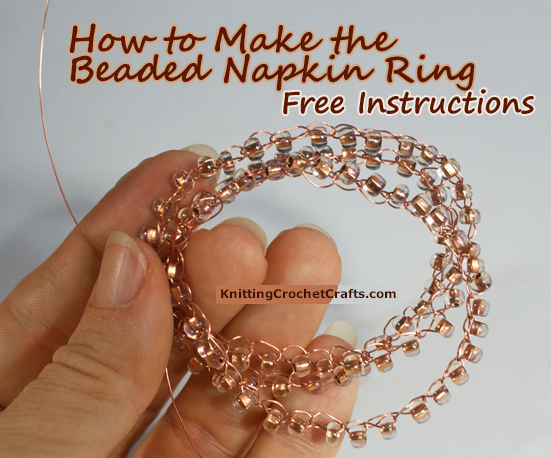
How to Wire Crochet With Beads + Free Beaded Napkin Ring Pattern
I have bunches of beads and wire in my craft supplies stash, and my imagination is running wild with possibilities for all things I could make with them. As I was considering some of my options, I decided that a set of napkin rings would be a fantastic project to share here on KnittingCrochetCrafts.com.
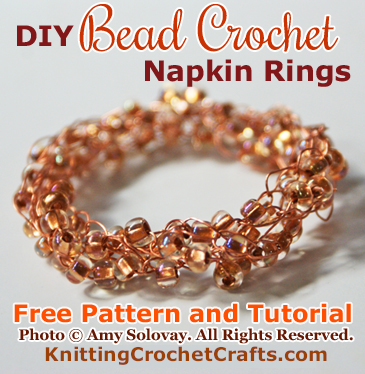
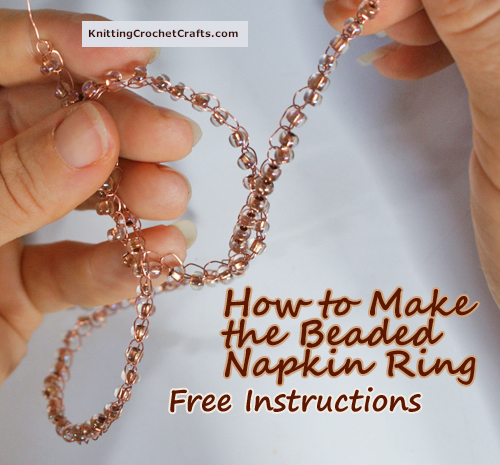
DIY Beaded Napkin Ring — Learn How to Make This Craft Project Using Our Free Pattern, Instructions and Tutorial
Folded Napkin Placed in a Beaded Napkin Ring — Learn How to Make a Set of Napkin Rings Just Like This One — and Learn How to Wire Crochet With Beads: Free Tutorial With Step-By-Step Beaded Napkin Ring Instructions
I chose this particular craft idea for several reasons:
1. These napkin rings are a great starter project for learning the wire and bead crochet technique. While I wouldn’t exactly call this an easy technique, for bead and wire crochet, this project is about as easy as it gets. Don’t worry, it isn’t difficult and it isn’t rocket science; it just takes a little practice to get the hang of it, and this project is very forgiving of any imperfections in your technique. When you look at your finished napkin rings later, you most likely won’t notice little issues like odd spacing that are inevitably part of your learning curve when you first attempt the wire crochet technique.
2. You don’t need to worry about buying or attaching “extras” such as clasps, closures and jewelry findings, like you have to with certain other types of wire crochet projects. You can just focus on working with the beads and wire.
3. The napkin rings are beautiful, not to mention they’re always useful to have on hand for entertaining — particularly for holiday entertaining — on occasions such as Thanksgiving, Christmas, New Year’s, Valentine’s Day…You can make them in green for St. Patrick’s Day if that’s a holiday you celebrate… Of course, please feel free to use other bead and wire colors to coordinate better with the colors that you’d be using to set your holiday table.
How to Bead Crochet
There are many, many different possibilities for how to do bead crochet. I’m going to show you one possibility that’s hugely useful and versatile. In addition to making the napkin rings pictured here, I’ve also used it for creating jewelry including bracelets, chokers and necklaces. I can envision using it to create things like purse straps, motifs, belts, and garlands. I’m betting you could think of additional artistic ways to use this technique — and I encourage you to do so if the idea interests you. I really hope you will find these ideas inspiring.
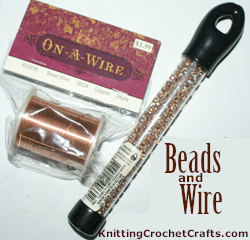
Beads and Wire: Supplies for Wire Crochet With Beads
Beads — To make one napkin ring, I used 90 Czech glass seed beads in the 6/0 size; these are manufactured by Beader’s Paradise. My beads are marked with “crystal- bronze-lined AB” (Aurora borealis) on the package. Of course, you do not need to use these exact same beads; feel free to substitute any 6/0 seed beads when you work this pattern. You might also get interesting results from using other bead sizes as well, although I don’t recommend using this pattern with really large beads.
Everyone’s crochet is unique, which makes it difficult to predict precisely how many beads you’ll need for crocheting each of your napkin rings. You may need more beads, or fewer, to make a napkin ring of the same size. Better to buy a few extras and not need them, than to not have enough beads and run out.
Do keep in mind my 90 beads only made one napkin ring, and that you’ll probably want to make more than one. So you’ll need to buy enough beads to make an entire set.
The size of your set is up to you; there are multiple possibilities for how to decide on the number to make. You could make one napkin ring for every chair at your table. Or you could make one for every plate in your set of dinnerware. Or you could make one napkin ring for every family member, and perhaps a few additional rings if you want to be able use them while entertaining guests.
Wire — I used 26 gauge copper craft wire to make my sample project. I purchased this wire at Hobby Lobby, but there are many different suppliers for this type of wire. At this point, I hesitate to try to make any recommendations about how much wire you’ll need to buy. I used a spool with 24 yards of wire, and it was way more than enough to make the sample napkin ring. I haven’t yet made the rest of my set of napkin rings to know how many more rings I can get out of the 24 yard spool. But even if I did know how many I can make, that doesn’t mean you’d need exactly the same amount; you’re likely to need a slightly different amount, due to individual differences in the way people crochet. When my set is complete I will work on updating this page to let you know how much I used in total.
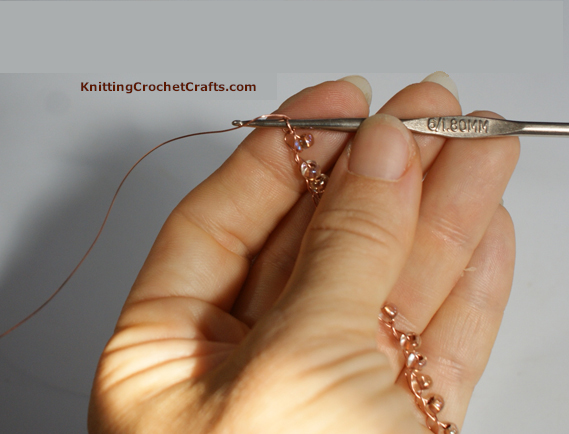
Crochet Hook — I used a steel crochet hook measuring 1.80 mm to crochet the sample project. I think steel crochet hooks are great for wire crochet, because they are small but sturdy. Even so, I should mention that wire crochet is hard on your hooks. Be prepared for the possibility that your hook could break, and choose your hook accordingly. This is not a good project for using with family heirloom hooks or any hooks of particular value or significance.
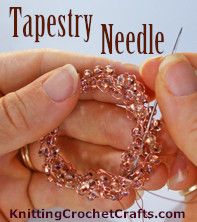
Use a Tapestry Needle for Weaving in Your Loose Ends of Wire
Tapestry Needle — I like using tapestry needles for hiding the ends of my wire, although there are other acceptable ways to accomplish the same task. Please note that my photo shows me using a large tapestry needle, which is not ideal; ideally, you’ll want to work with the smallest needle that will comfortably get the job done.
Gather your supplies and let’s get started!
The first step is to string your beads onto your wire. I recommend stringing more than you think you’ll need, because you never know exactly how many you’ll need. After you begin crocheting, it’s not all that easy to add extra beads to the end of the work. It’s not totally impossible in this case, but it’s a pain in the neck.
Next, pull out a length of wire. Leave a comfortable amount, at least 5 or 6 inches, because later after you’ve finished the crocheting, you will need to have enough wire to work with in order to hide the ends successfully.
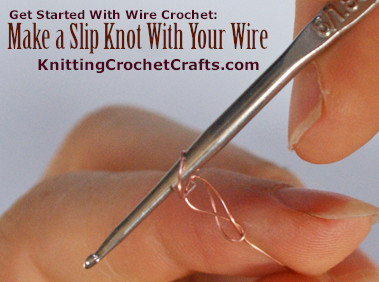
Make a Slip Knot in Wire for Getting a Wire Crochet Project Started
Next, you want to make a slip knot, which is the correct method to use for getting this project (and most crochet projects) started. If you don’t already know how to make a slip knot, or you know how but you need a quick refresher, you can find a free slip knot tutorial here on our website.
Important Note: Before you proceed any further, you should be aware of one important thing: it’s extremely difficult to correct mistakes in wire crochet. Some crocheters even say that it’s impossible, although that hasn’t been my experience. I’ve been able to correct quite a few of my mistakes in the past, but I can say this: you can’t ever, ever take it for granted that you’ll be able to fix a mistake in wire crochet. Sorry, I know that’s not the news you wanted to hear, but it’s the truth.
So, with that in mind, here’s some advice.
As you’re working in this technique, you’re likely to make some places with odd spacing. It’s going to happen. If you’re used to traditional crochet with yarn, you might be in the habit of just pulling the oddball stitches out, redoing them and then getting on with the rest of the project.
With wire crochet, that habit is going to have to change. Unless something is really, totally, completely, unbearably wrong, just leave it and keep going.
Like I mentioned before, this project is forgiving of odd spacing, and most of the time it won’t make a bit of difference in the finished project. So don’t worry about it, and just keep going.
Okay, so after you’ve made your slip knot, the next thing you want to do is grab the first accessible bead and push it along the wire to get it right up close to your slip knot. Then you’re going to grab the wire with your crochet hook and pull it through the loop on your hook, essentially working a chain stitch with a bead stuck inside of it.
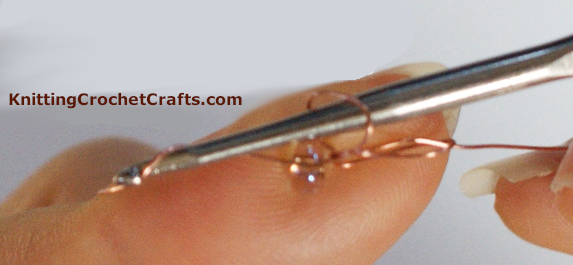
How to Do Wire Crochet With Beads — Free Instructions and Tutorial — Work-In-Progress Picture
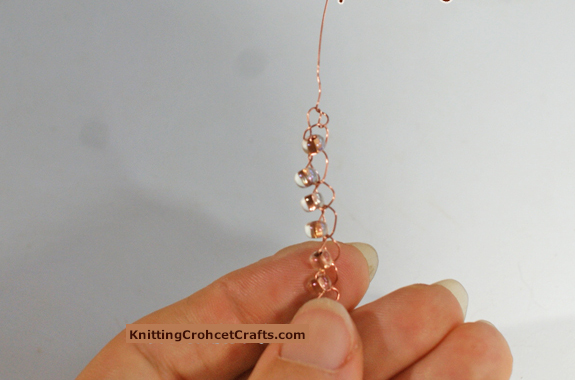
It will look something like this when you’ve completed the chain:

Wire Crochet With Beads: Free Tutorial and Instructions — Work-In-Progress Picture
Now just keep working beaded chains, just like the first one, until you have a length of beads crocheted using the wire. Push another bead up the length of wire…
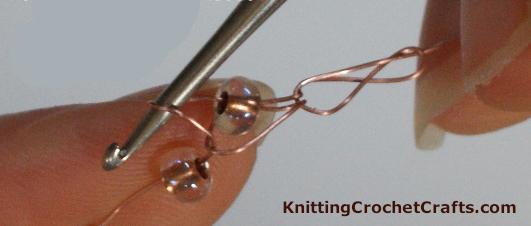
How to Wire Crochet With Beads: Free Tutorial — Work-In-Progress Picture
…and grab the wire with your crochet hook.
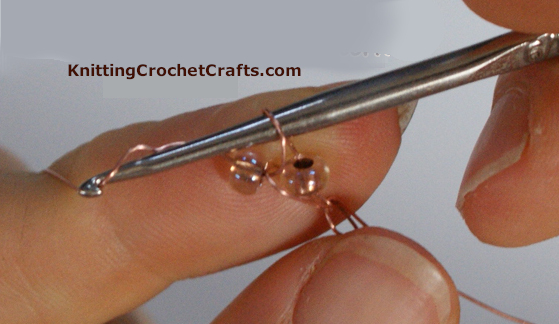
How to Wire Crochet With Beads: Free Tutorial — Work-In-Progress Picture
Pull it through to form the next stitch. Repeat over and over and over and over again until the piece is the length you want it to be.
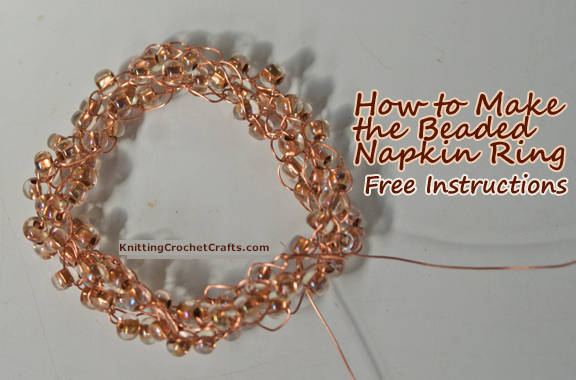
How Long a Length of Beads and Wire Do You Need to Crochet?
The finished size of your napkin ring depends entirely on the length of the piece you crochet here. My sample napkin ring is small, with an outside diameter of about 2 inches and a circumference of about 6 inches.
To achieve that size, I crocheted a beaded piece that measured about 19 inches long.
That might or might not be the best length for you to make yours. If your napkins are really big or thick, you might want to make a larger ring.
You can visually estimate whether you’ve got the right size by coiling the piece into three loops and stacking them on top of each other as pictured (although you probably want to put a safety pin in your active loop to keep from losing it, which I did not do in the photo.)
How to Make the Beaded Napkin Ring: Free Instructions
This will be just slightly larger than the approximate size of your napkin ring; you’ll lose a little bit of circumference because the strand will be twisted together, but this will at least give you an approximate idea of the size your napkin ring will end up if you stop crocheting at your current spot.
If you’re uncertain of how your napkins will fit inside the ring, you can grab one and try it before you proceed. Again keep in mind that the finished ring will be a little smaller than your 3 stacked-and-coiled loops.
My advice is this: if there’s any uncertainty about whether your napkin ring will turn out to be too small, go ahead and make it a little bigger by crocheting a few more beads at the end of the piece. Most of the time, a too-big napkin ring holder won’t be unusable, but a too-small napkin ring holder will be useless.
What to Do If You Didn’t String Enough Beads, and You Run Out: If you somehow manage to run out of beads and your piece is too short, DO NOT END OFF YET. Here’s how you can attempt to fix this problem. I make no guarantees that it will work, because there is some guesswork involved. But, you can try this, and maybe it will work.
Try to guess at the amount of wire you’ll need to work with to finish up the project. Pull out this length of wire and perhaps a little bit more — just to be on the safe side. Cut this length to detach it from the spool.
Now string more beads onto the newly-cut end. When you’re finished, wrap the end around some sort of stopper like a paper clip or safety pin, to prevent the beads from falling off while you work.
Continue working until you (hopefully) have the length you want.
How to Make the Beaded Napkin Ring: Work-In-Progress Picture
When you’re satisfied that your piece is the correct length, you’re going to end it off. End off by simply cutting the wire, grabbing the wire with your crochet hook as pictured, and pulling the end through the active loop on your hook. When you cut the wire, remember to leave a length at the end of at least 5 or 6 inches so you have enough to work with when you need to weave in your ends later.
How to Crochet the Beaded Napkin Ring: Free Tutorial — Work-In-Progress Picture
After ending off, the work will look something like this.
How to Make the Napkin Ring
OK, so now we’ve got this piece of beaded crochet chain, and we want to transform it into a napkin ring. Here are the instructions for how to do that.
First, use approximately the first one-third of the piece to form a loop, loosely tying the ends together as shown in the picture below.
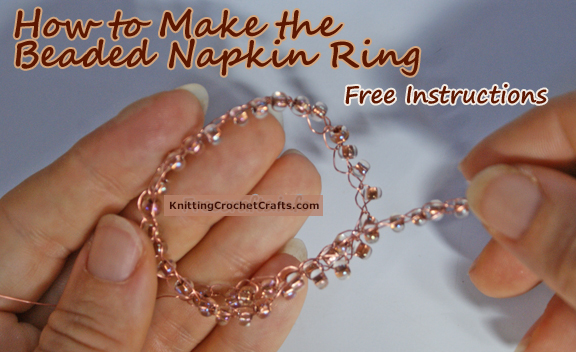
How to Make the Beaded Napkin Ring: Free Instructions
Next, grab the longer end of the chain and wind it through the ring, manipulating it and twisting it as you go, with the goal of getting the most appealing twisted effect you can possibly get from it.
How to Make the Beaded Napkin Ring: Free Instructions
Continue putting that end through the ring, twisting and manipulating until you’ve twisted the entire length into the ring.
Your napkin ring is almost finished, but you still have a couple of loose ends to deal with — literally.
The Napkin Ring Is Taking Shape, But You Still Have Loose Ends to Deal With
If it’s reasonably easy to make your ends meet up, you may wish to twist them together once or twice before you weave them into the project. If they’re a little shy of meeting up, no worries, just go ahead and weave them in without twisting them.
How to Weave in Your Ends When Crocheting With Wire:
I deal with my loose ends by weaving them into the project in roughly the same way I do with projects I crochet in yarn and thread. There are a few minor differences, but the process is essentially the same.
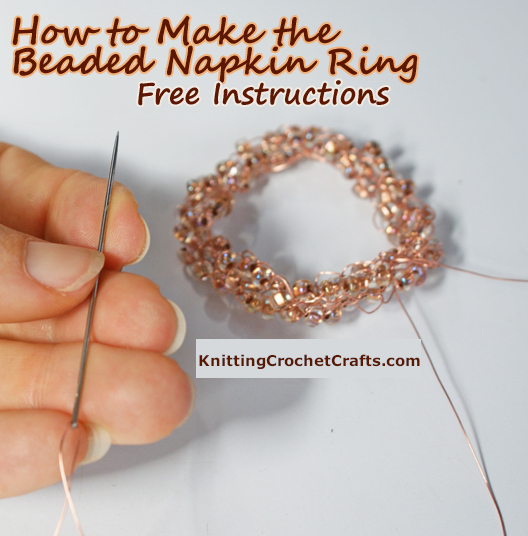
How to Finish the Beaded Napkin Ring
I start by threading one of the loose ends onto a tapestry needle.
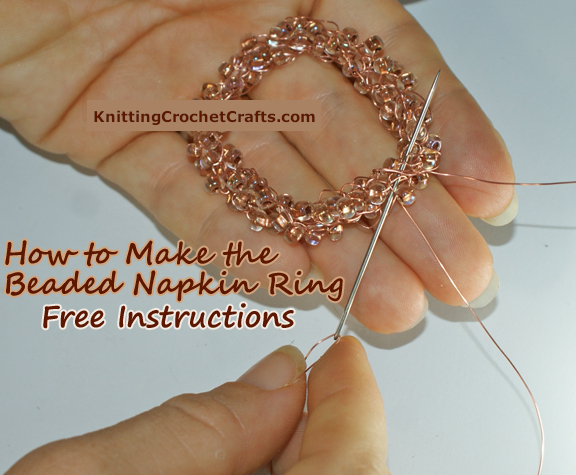
Finishing the Beaded Crochet Napkin Ring: Work-In-Progress Picture
Then I use the needle to “sew” the end into the project, camouflaging it carefully as I go. In several places as I was finishing my project sample, I also strategically wrapped the end around all 3 coils of the finished napkin ring, just for a little extra insurance that the napkin ring will never come un-twisted in the future.
When the end is sufficiently camouflaged, cut it off and bend any extra down so that it is buried in the project.
Repeat with the other loose end.
It’s finished! WOW, isn’t it beautiful?
DIY Beaded Napkin Ring — Learn How to Make This Craft Project Using Our Free Pattern, Instructions and Tutorial
The Finished Napkin Ring
These napkin rings look fantastic with natural-colored linen napkins, as pictured; they’re also beautiful with clean white napkins as well. Other colors that would look great: cream, eggshell, pale peach, or butter yellow. There are certain printed napkins and probably many other colors that would coordinate well with them.
Of course, when you make your own napkin rings, you can choose exactly the colors of beads and wire to use to coordinate perfectly with your napkins. That’s the beauty of DIY! You can make exactly what you want and need to express your own artistic vision for your home.
Remember to make more matching napkin rings to complete the set!
Setting the Table With Your New Beaded Napkin Rings:
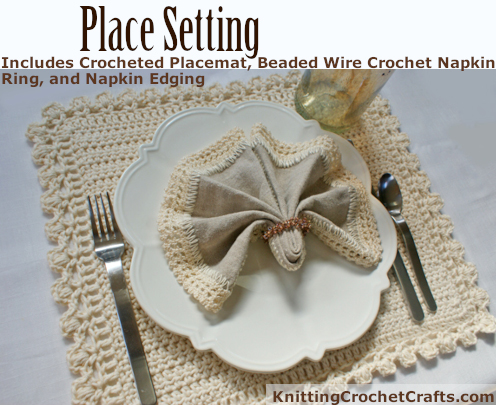
This Place Setting Includes a Beaded Crochet Napkin Ring, a Folded Cloth Napkin With Crocheted Edge, and a Crocheted Placemat. Get the Free Crochet Patterns for All of These Items Here on Our Website.
Won’t it be fun to fold up some napkins and set the table with your brand new napkin rings? I’m excited to try mine, and I think it will be quite satisfying.
Hopefully your napkin rings work well with your existing table decor — but if they don’t, this is a great opportunity to craft a few more lovelies to put on your table.
You might want to grab some crochet edging patterns to dress up the edges of your napkins or other table linens.
If you beaded along with me and made your own set of napkin rings, I really hope you’ll enjoy them! And if you didn’t…I sure hope you’ll either give them a try, or that you’ll find a different craft project to work on to satisfy your creative urge. Here are links to some related resources that might be of interest:
- Find our picks for the best beadwork books.
- Beadwork Patterns, Tutorials and Project Ideas
- DIY Home Decor Crafts
Find More Ideas for Spectacular Table Settings
- Find a Whole Bunch More Napkin Ring Patterns and Ideas
- Crochet Coasters
- Crochet Placemats
Crochet Books You Might Enjoy:
Overlay Crochet Book by Kristi Simpson, Published by Leisure Arts
- Best Crochet Home Decor Pattern Books
- The Best Crochet Stitch Dictionaries
- The Best Crochet Books for Beginners
- The Best Crochet Baby Pattern Books
- The Best Crochet Blanket Pattern Books
- The Best Crochet Edging Pattern Books
- The Best Books on Crochet Flowers
Learn More About Crochet:
The Beaded Edge 2: A Bead Crochet Pattern Book Published by Interweave
- Click Here to Learn How to Crochet; This Link Takes You to a Total Beginner’s Guide to Crochet.
- Click here to find crochet stitch tutorials and instructions.
- Click here to learn more crochet techniques.
- Click HERE to Find Fabulous Yarn for Crochet and Knitting
- Click here to learn about crochet hooks.
- Click here to find my favorite crochet project bag.
Learn About Other Crafts: Knitting, Sewing, Quilting, Paper Crafts and More
Home Candle Making Book From the Make & Give Series Published by Leisure Arts
- Click here to get updated on the latest craft supplies.
- Click here to learn about knitting.
- Click here to find our beginner’s guide to knitting needles.
- Get the lowdown on the best craft supplies
- Yarn for Crochet, Knitting and Other Crafts
- Quilting
- Learn about jewelry making
- Find the best jewelry-making tools for beginners
- Learn about beadwork techniques
- Check out sewing ideas and information
- Find kitchen craft ideas and projects
- Celebrate the holidays with festive holiday crafts
- Discover new Christmas craft ideas
- Find paper craft projects and instructions
- Click here to find more craft project ideas.
Posted By: Amy Solovay
This page was last updated on 8-7-2021.